Visualizzazione post con etichetta TeamSpellbinders. Mostra tutti i post

martedì 28 aprile 2026

You Have A Beautiful Heart

Hi crafty friends!

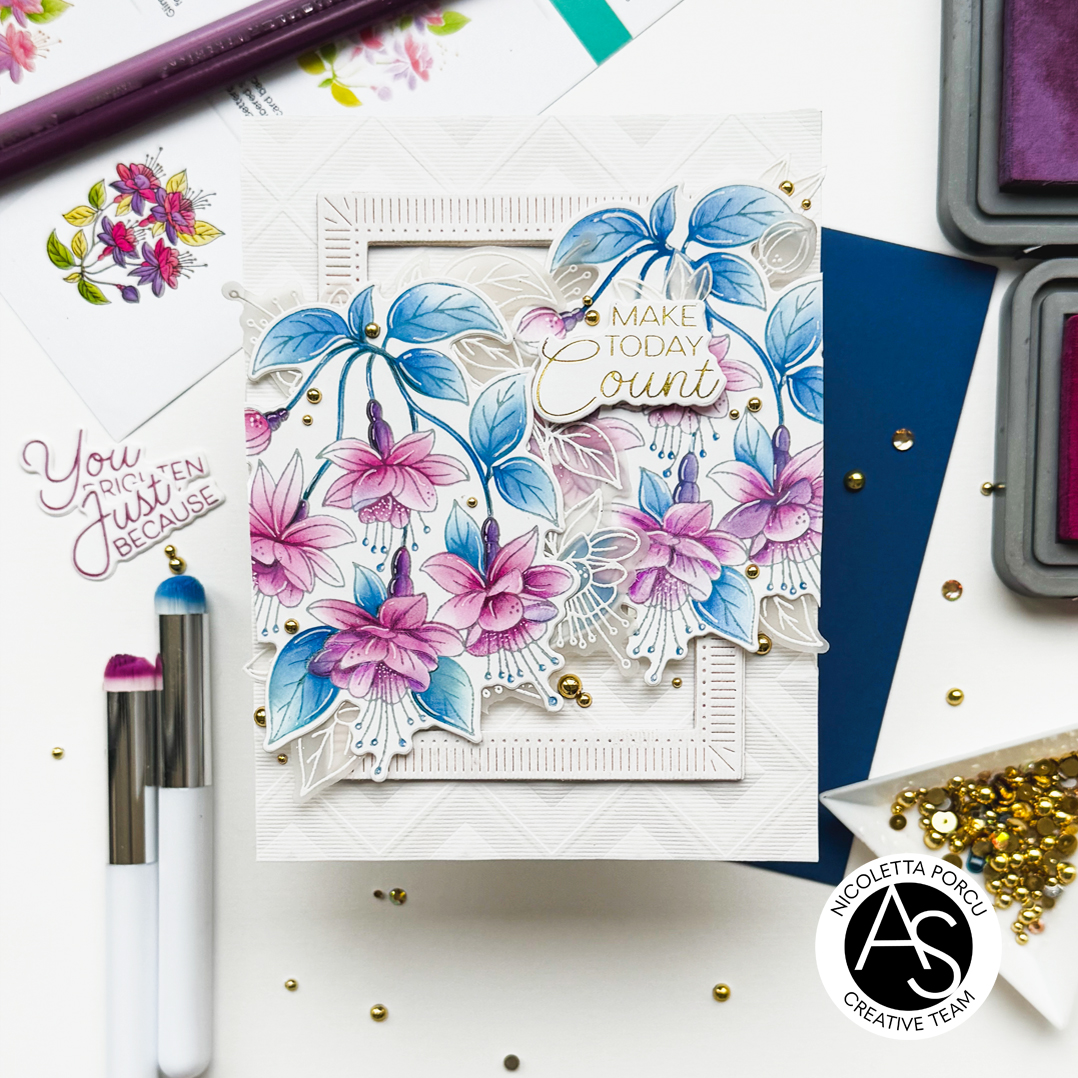
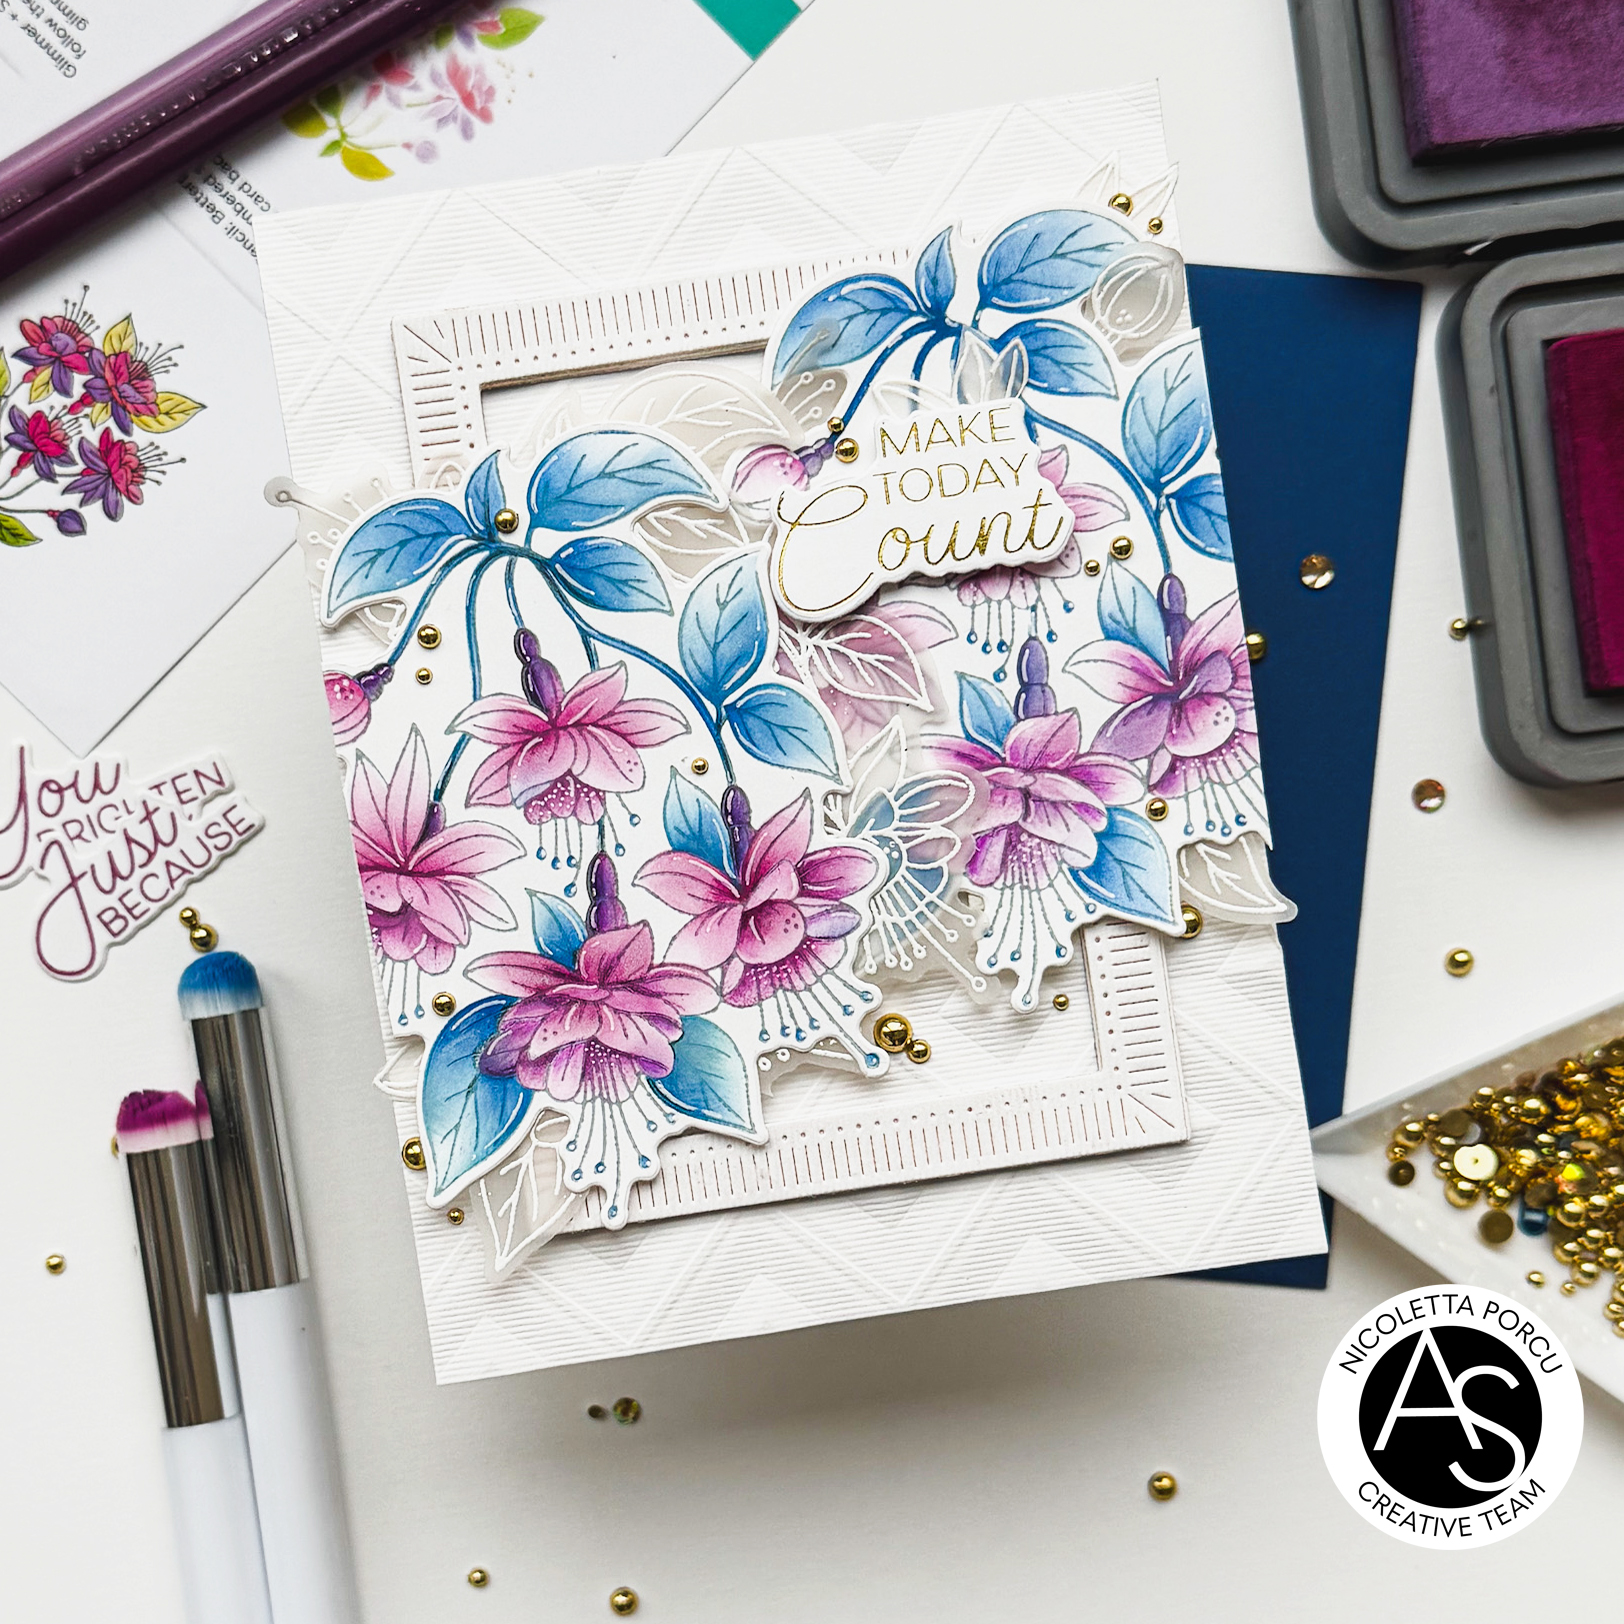
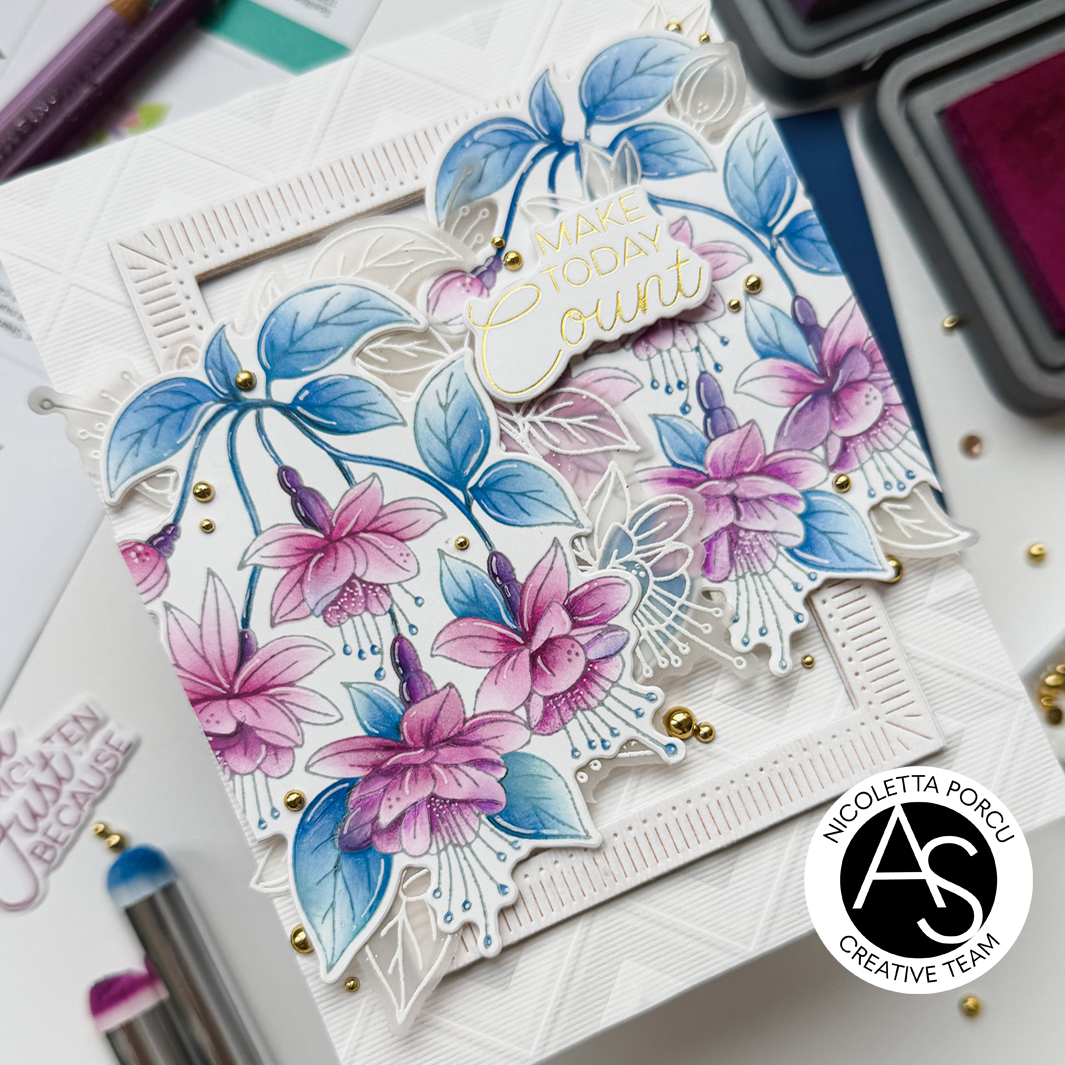
I'm here  today sharing  a new card with you.  Another one using the products from the amazing new Magical Fuchsia release by Alex Syberia Designs for Spellbinders.

I love this release and I cant't stop myself to make card with it.

Hope you like this one too.

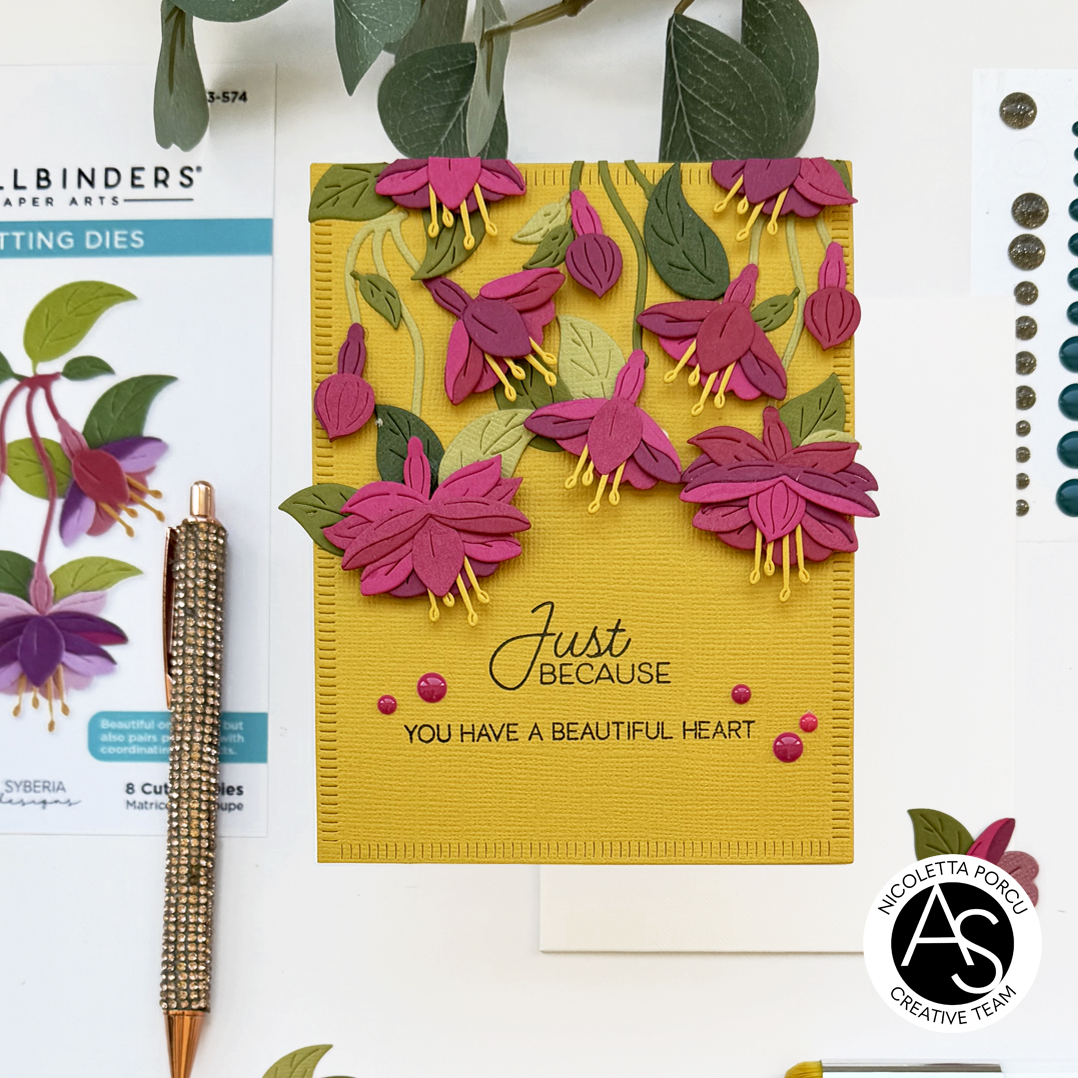
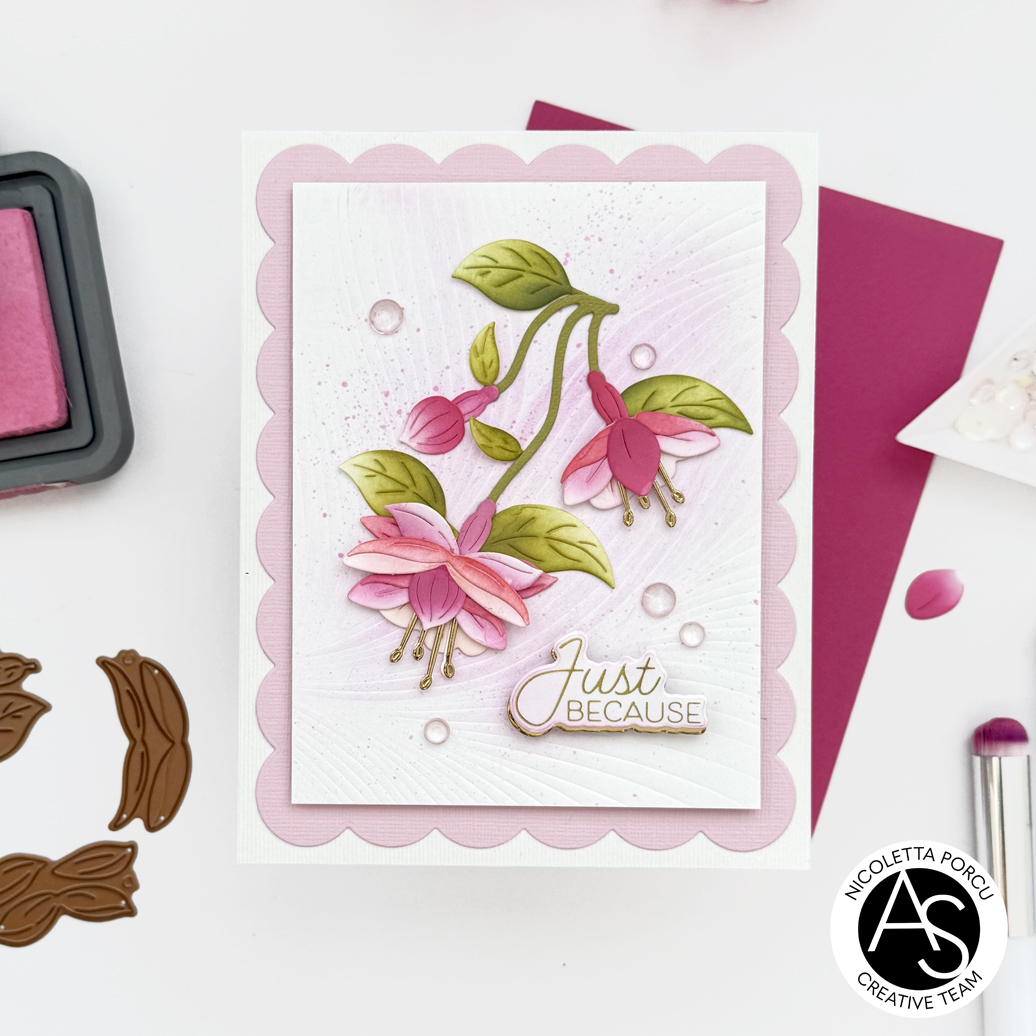
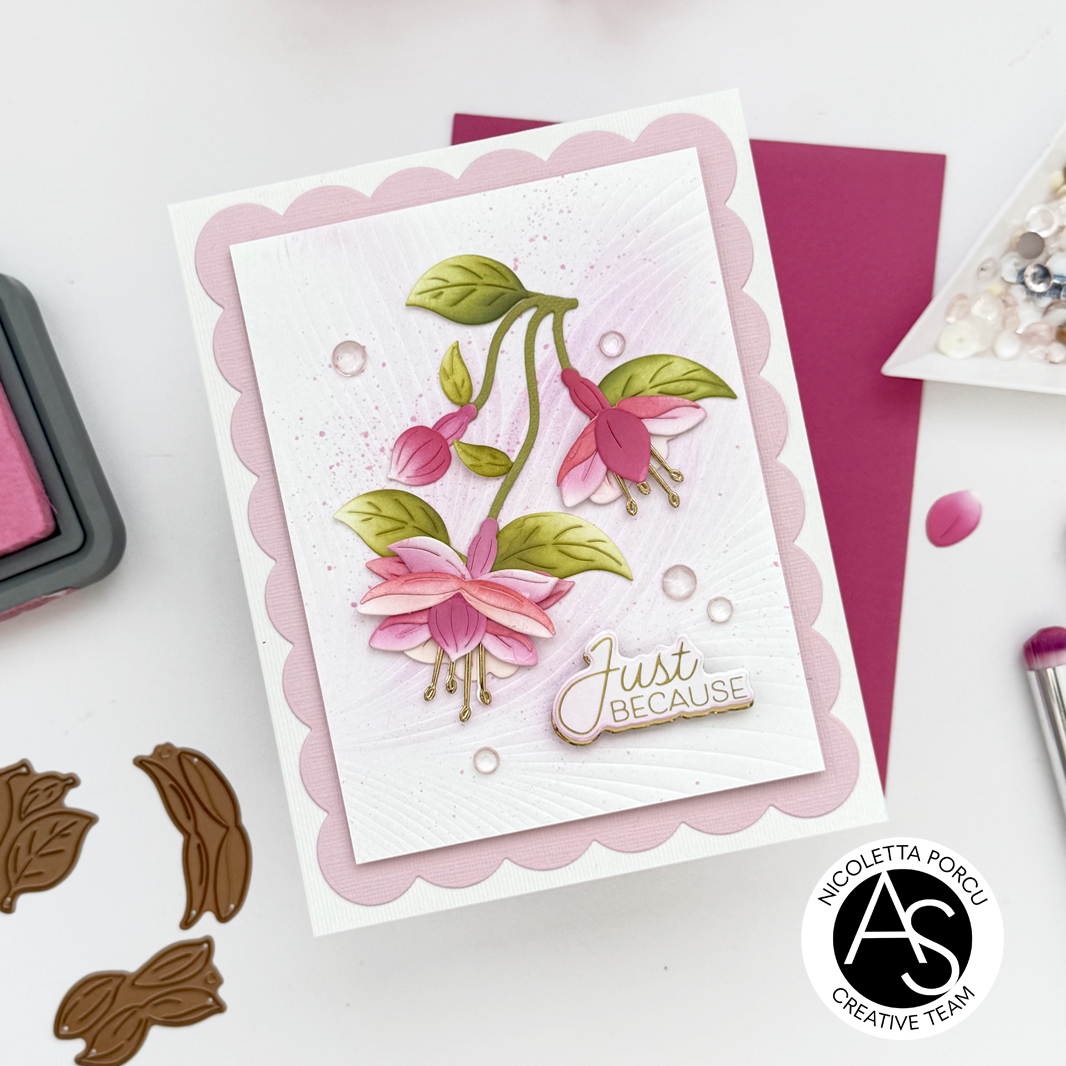
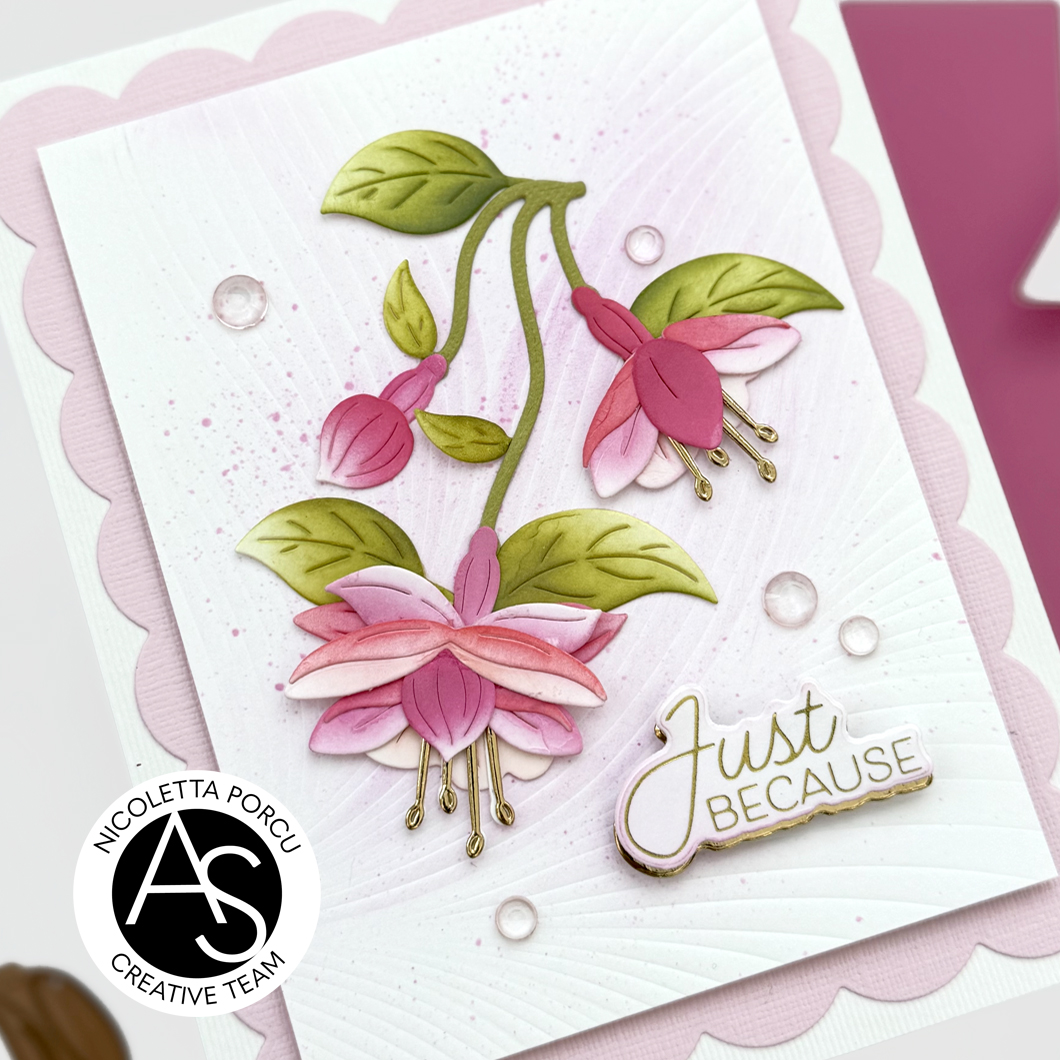
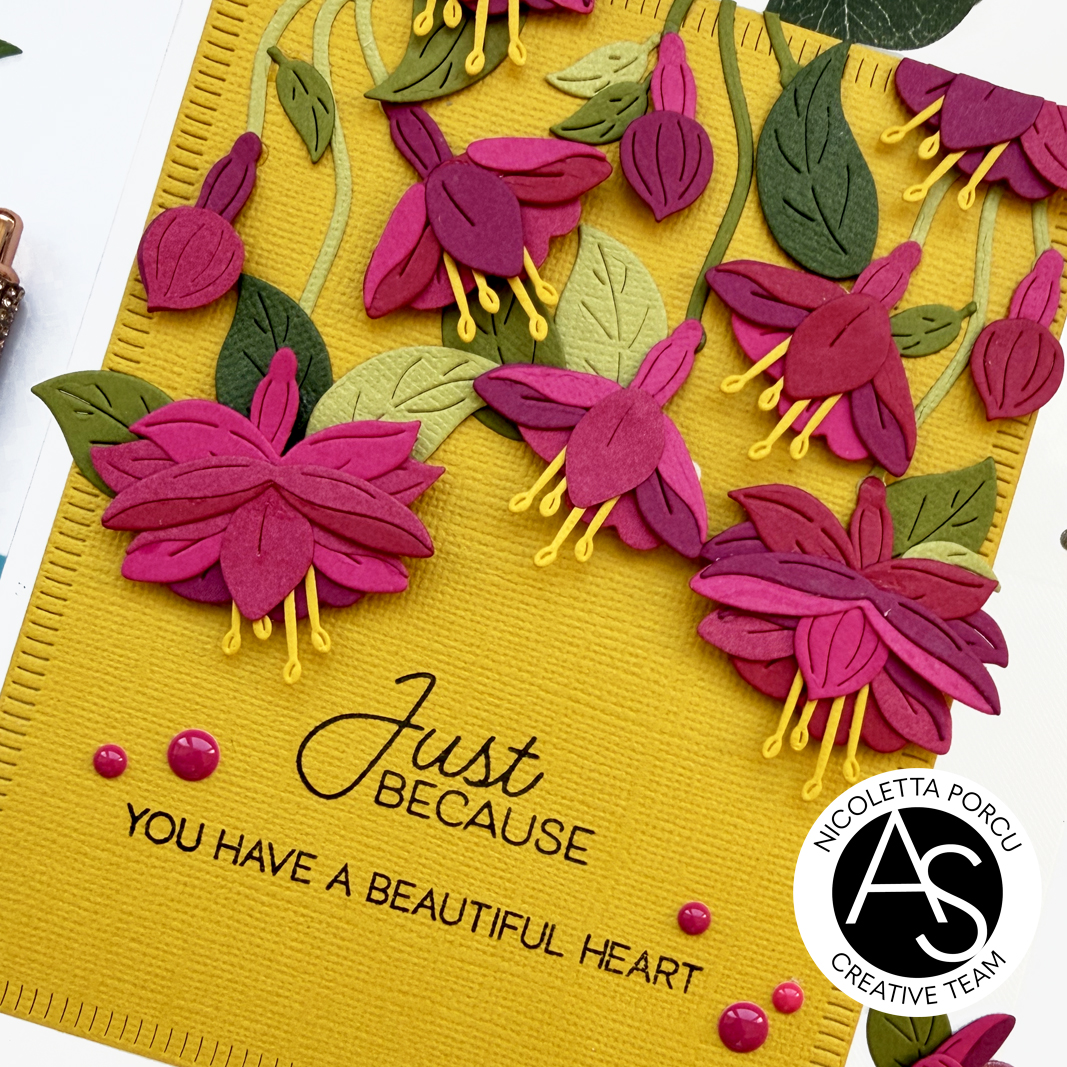
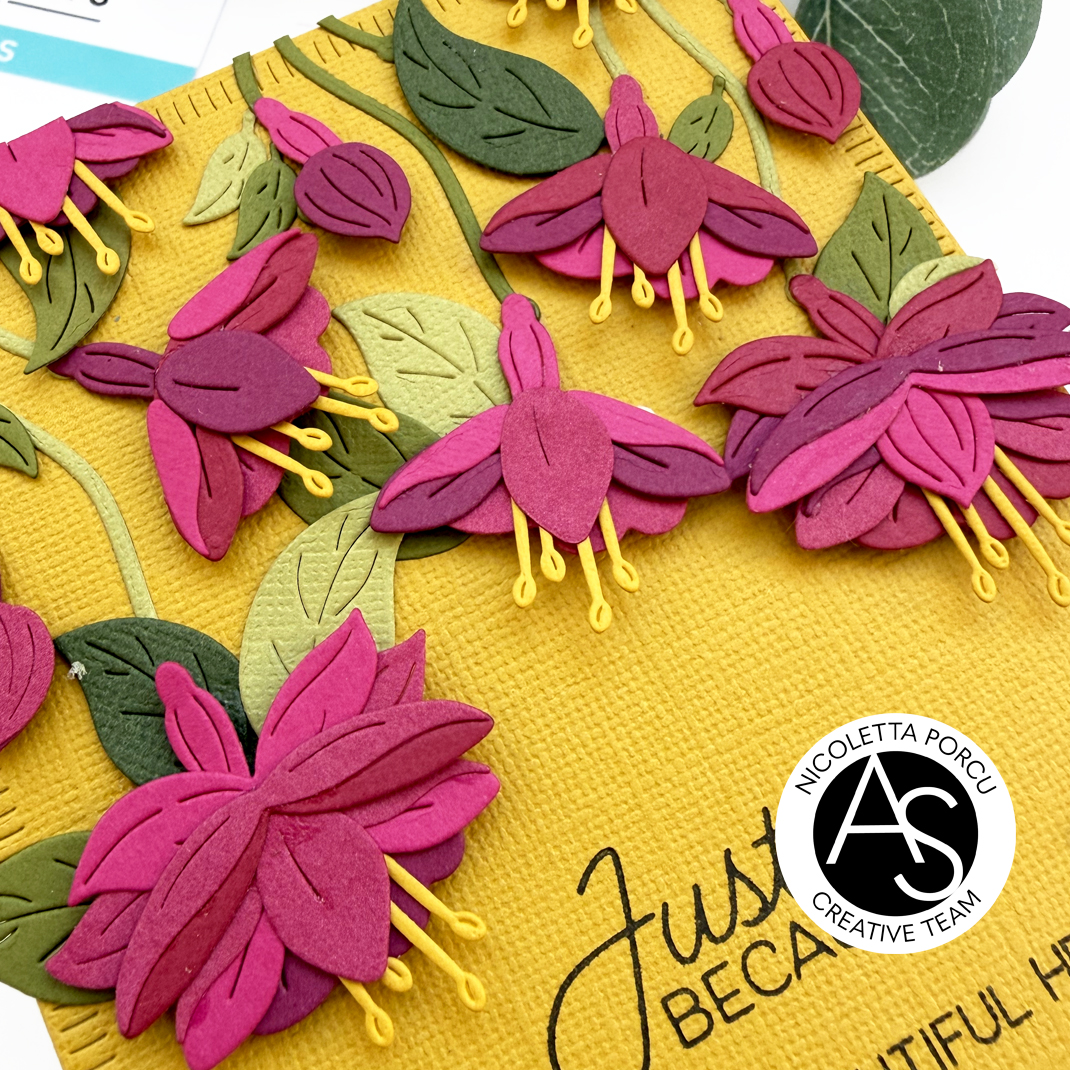
To make my card I started by die cutting all the elements from the Magical Fuchsia Die set using colored cardstock in pink and green shades and then I assembled all the floral branches and I put them aside.


Next up I die cut a mustard rectangle by using the Good Day Quilted Rectangle die set, and I stamped over this the sentiments using a press plate  from the Magical Fuchsia Press + Foil Plate & die set and a clear stamp from the Spring Garden stamp set.

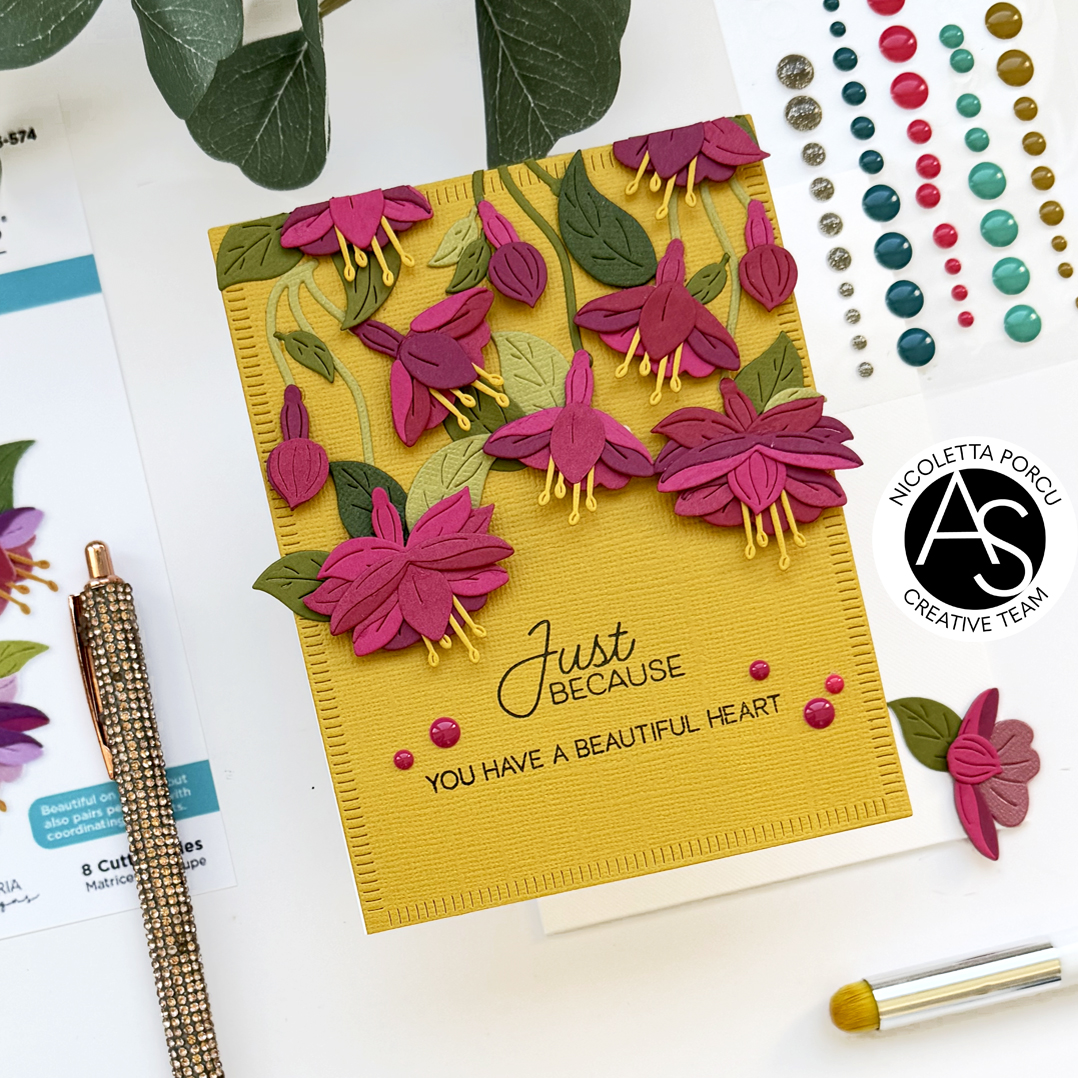
I glued it over a base card and then I did my flower arrangement using the Fuchsia flowers I previously assembled  gluing some elements using foam pads to add dimension.

As a last thing I added some enamel dots and that's it!

Below a recap of all products I used:

Magical Fuchsia Die set

Magical Fuchsia Press + Foil Plate & die set

Good Day Quilted Rectangle die set

Spring Garden stamp set

Spellbinders New & Improved Platinum Six Die Cut and Embossing machine

Spellbinders BetterPress Letterpress System

You could find all of them on Alex Syberia Design UK shop and on the  US Alex Syberia Design shop   for the American friends.

Thank you so much for stopping by!

See you soon

Ciao ciao

martedì 21 aprile 2026

Just Because

Hi crafty friends!

I'm here  today ,sharing  a new card I made using the products from the amazing new Magical Fuchsia release by Alex Syberia Designs for Spellbinders.

Hope you like it!

To make my card I started by die cutting all the elements from the Magical Fuchsia Die set using a Neenah white paper and a metallic gold one for some elements; I colored the pieces blending them with Distress Oxide inks, I assembled the flowers branch and I put it aside.

Next up I prepared my  embossed background using the Abstract Background Press plate and lightly blended  and sprayed it with Distress Oxide;

I die cut it into a rectangle, I framed it with a baby pink scalloped frame I made using the Nested Scalloped Frames die set and i glued them over a white base card.

I continued by adding the Fuchsia Flowers I previously assembled and the little gold hot foiled sentiment I made using the Magical Fuchsia Press + Foil Plate & die set  and I glued it on the right lower side go the fuchsia flowers.

As a last thing I added some clear  beads and that's it!

Below a recap of all products I used:

Magical Fuchsia Die set

Nested Scalloped Frames die set

Magical Fuchsia Press + Foil Plate & die set

Abstract Background Press plate

Spellbinders New & Improved Platinum Six Die Cut and Embossing machine

Spellbinders New and Improved Glimmer Hot Foil System 

You could find all of them on Alex Syberia Design UK shop and on the  US Alex Syberia Design shop   for the American friends.

Thank you so much for stopping by!

See you soon

Ciao ciao


martedì 14 aprile 2026

Make Today Count

Hi crafty friends!

I'm here here  today sharing  a new card I made using the products from the amazing new Magical Fuchsia release by Alex Syberia Designs for Spellbinders.

You appreciate my latest card  with these products on my Instagram account @nicolettaporcu.design and hope you like this one too.

To make my card I started by stamping  twice, the fuchsia Flowers  using the Magical Fuchsia Press + Foil Plate & die set on a white coloring paper;  I placed it   on the Spellbinders Letterpress Betterpress System , I inked it using  the London Fog Memento ink and I running it through the Spellbinder Six Platinum Machine to obtain my  stamped and pressed flower  images.

Next up  I colored the flowers  using Distress Oxide ink on the Magical Fuchsia Layered Stencil ; I used the Seedless Preserves, the Dusty Concord, the Salty Ocean, the Prize Ribbon and the Specled Egg colors; I refined the details with some touch of Prismacolor pencils and a white gel pen and then I die cut them using the coordinate die.

Next Up I stamped the same Fuchsia flowers on vellum using Versamark ink and I embossed them in white using a Lawn Fawn white embossing powder. I die cut them too and I put all my flowers aside.

Then I prepared  my embossed background using the  Beveled Diamond 3D Embossing Folder by Spellbinders(discontinued); I die cut it into a 4 1/2" x 5 3/4" rectangle and I glued it on a same size base card.

Then I die cut the white frame using the Fluted Classic Rectangle die set by Spellbinders (discontinued). I die cut it in five layers I glued all together to add dimensions ; I place it on the center of the card and then I arrange over  my flowers composition putting the white embossed vellum flowers between the colored ones and then adding some vellum leaves all around them,

Next up I made the hot foiled sentiment using the Magical Fuchsia Press + Foil Plate & die set, and I glued it on the right upper side go the fuchsia flowers.

As a last thing I added some metallic gold beads and that's it!


Below a recap of all products I used:

Magical Fuchsia Layered Stencil

 
Beveled Diamond 3D Embossing Folder by Spellbinders (discontinued)
 
Fluted Classic Rectangle die set by Spellbinders (discontinued)

Thank you so much for stopping by!

See you soon

Ciao ciao


sabato 11 aprile 2026

Magical Fuchsia release by Alex Syberia Designs for Spellbinders

Hi crafty friends!

So excited today because the Magical Fuchsia release by Alex Syberia Designs for Spellbinders is live and it is amazing.  You will love it for sure!

Here the first card I made mixing some  new products :


To make my card I simply started by embossing the  Fuchsia flowers on a Neenah paper , using the Magical Fuchsia 3D embossing folder and then  I colored them using the coordinate Stencil set, the Magical Fuchsia Layered Stencil and some Altenew inks.


I die cut  it into a 3"x  4 1/4" rectangle and I glued it over a  4 1/4 x5 1/2 base card. I used foam stripes to add dimension.


Next up I made the hot foiled sentiment using the  Magical Fuchsia Press + Foil Plate & die set and I glued it  o the  right upper of the fuchsia flowers.

As a last thing I added some metallic gold beads and that's it!!

Here a recap of all the products I used:


Hope you like my card and this amazing collection! 

You could find it on the Alex Syberia Design Shop and on the Spellbinders shop.

Thank you for stopping by!

See you soon with a new card.

Ciao Ciao


martedì 20 maggio 2025

Japanese Aesthetic

Hi crafty friends!

I'm here today, to share with you another card featuring the new amazing "Spring in Kyoto" collection by Spellbinders, designed by Alex Syberia Designs.

It's a very elegant release inspired by the Japanese aesthetic and you could find it at alexsyberiadesigns.com  and alexsyberiadesigns. co.uk.

To create this card , I first stamped the lovey parasols on a rose-cream cardstock using the Sand Versafine Clair ink and the Parasols Betterpress Plate.

I die cut it in a  4 1/4x 5 1/2  panel and a cover it with a  vellum rectangle,.   I then glued it on a black base card.

I continued by die cutting and assembling  the lovely fun using the Fan & Bow Etched dies ; I then used the Blossom & Sentiments Betterpress Plate & die set  to create some  blooms.  I  hot foiled in pale gold the blue and red ones and I stamped in black on cream the others.  using the Press Plate .I also  stamped,  white embossed   and die cut the "For You" sentiment from the same set.


Next up I adhered the fan,  the blooms  and the sentiment on the card using for some of them foam tape to add dimension.

I used the Kokeshi Dolls BetterPress Plate & die set and I hot foiled the beautiful Kokeshi Doll in a pale gold.  Then I coloured the image with Copic marker; I die cut it and I added the kokeshi in the card using foam tape.

To finish the card  I added some black and gold gems.


Here a recap od all products I used:

Blossom & Sentiments Betterpress Plate & die set

Kokeshi Dolls BetterPress Plate & die set

Fan & Bow Etched dies

Parasols Betterpress Plate

That's it for today!

Than you so much for stopping by

Ciao Ciao


martedì 13 maggio 2025

Kokeshi Doll in Kyoto

Hi crafty friends!

So excited today to show the card I made with the new Spellbinders collection with Alex Syberia Designs: Spring in Kyoto. It's a very special collection designed by Alex!!I'm a big fan of Kokeshi Dolls and I'm in love with everything about Japan so you can image how much I adore  this release !!

Here the first card I made mixing some  new products :

To make my card I started by the background ! I first, embossed a fawn rectangle using the amazing Floral Fans 3D Embossing Folder  I glued it over bigger white base card. I used a 4"x5" heavy cardstock between the base and the embossed background to add a little bit of  dimension,

Next up I stamped  the cherry blossom images on Neenah paper using the Cherry Blossoms Betterpress Plate & die setand a light pink Memento ink; I colored all with Copic markers adding some touches of Prismacolor pencils and white gel pen and I added them on the card using thin foam dots.

I continued by die cutting the Kokeshi Dolls Etches dies; I used Neenah paper to be able to color the various elements with my Copic markers and once the Kokeshi Dolls was assembled I added her on the card.

I added the sentiment I made by using the Blossoms & Sentiments Betterpress Plated & Die set. I heat embossed the thank you word in white and then I die cut it using the banner die included.


As a last thing I added some little pink flowers and some beads and that's that.

Hope you like my card and this amazing collection!

You could find it on the Alex Syberia Design Shop and on the Spellbinders shop.

Thank you for stopping by!

See you soon with a new card.

Ciao Ciao

linktwin

Related Posts with Thumbnails

ShareThis