Visualizzazione post con etichetta Prismacolor pencils. Mostra tutti i post

martedì 27 aprile 2021

Plumeria card panel

Hi crafty friends!

I'm back  with a new card, this time colors with Prismacolor pencils!

In the last days I was tidying up and reorganizing some drawers ...

It's been a really  long time  since I've played with my pencils  so when I've opened their thin and I've smelled the parfume my noose is stuffed and I couldn't resist to use them and this is the result: 

To make the card I printed the Plumeria card Panel on Strathmore Toned gray paper and I started my coloring. Then I played with a white gel pen to emphasize the flower' borders.

In the top I stamped a little sentiment by Mama Elephant and I put  my front card on a white cardstock base.

This the digi stamp I used you could find in the AlexSyberiaDesign Etsy shop!


Hope you like my card!

Thanks for stopping by!

Ciao Ciao


mercoledì 10 marzo 2021

Wishing you the happiest birthday

Hi everyone!

I'm  here with a new nspiration card!

Let me tell something about... so.. since I saw the "Sweet Love Cupcake" stamps set in the AlexSyberiadesign Etsy shop,    I felt in love with it and I was so inspired by the Alex's coloring.

Yesterday I celebrate  my daugher's  15th birthday, and when I was thinking at her birthday card I had no doubt about the stamp  I would use :-)

This is the result:


To make the card, I simply printed it on Copic X-Press blending paper and then I colored it with Copic Markers, emphasizing  details with Prismacolor pencils and a white gel pen.

I framed the image with a black line , I added the sentiment by Simon Says Stamp and the lovely sequins to give some shine point.

Here the coloring's detail:


This the
 "Sweet Love Cupcake" digi stamp I used:


My daughter appreciate it so much!! Hope you like it too.

Thank you for stopping by

Ciao Ciao


lunedì 17 febbraio 2020

Be Careful.. doc Nozzy is watching

Ciao a tutti!
Oggi sono sono felice  di condividere con voi la mia prima card come designer per "Timbramisù DigiStamp"
Sono contentissima di far parte di questo talentouoso design team e di avere la possibilità di lavorare con questi bellissimi timbri digitali! li adoro!
Quando ho dovuto scegliere il timbro su cui lavorare non ho avuto nessuna  esitazione: il "Dottore severo"   ispirato al famosissimo dott. Nozze sarebbe stato il primo che avrei colorato!
Chi nella propria vita non si è mai dovuto mettere a dieta? quante persone conosciamo a dieta? 
È davvero uno scoglio questo argomento e quindi é  meglio affrontarlo con ironia  non pensate?
Il "Dottore severo" digi stamp é perfetto !

Hi Everyone!
I'm so happy to share with you my first card as a designer for the "Timbramisù DigiStamp".
I'm so excited to be a part of this telented design team and to have the chance to work with these beautiful digi stamps.
When I had to choose the digi to work with I had no hesitation: the "Serius Doc" would be the one I would color first; 
Who one in their life didn't go on diet? how many person you know is on diet? 
It's a deal breacker but is better to think about it with irony ! so the "Serius Doc" is perfect !!

Per fare la card (ispirata alla card bellissima del boss, nonché creatrice di questi timbri  Katia Meo) prima di tutto ho disegnato io stessa lo sfondo  digitalizzandolo..
Dopo, usando Photoshop, ho combinato il mio disegno con il timbro digitale "Serius Doc" e il sentiment, Quindi ho stampato l'immagine ottenuta su su la carta dei copy express branding card.
Poi, prima di iniziare la colorazione con i Copic ho mascherato tutti gli elementi e ho realizzato il muro e  il pavimento con i Distress Oxide inks sfumandoli con i pennelli "Life Changing blending Brushes".
Il resto dell'immagine é colorata con i Copic Markers, rifinita con le  matite Prismacolor e qualche tocco di penna gel bianca.


To make the card (inspired by our boss and the owner of Timbramisù shop Katia Meo first of all I design the background by myself and digitalized it. 
After,  using photoshop, I merged my own design with the "Serius Doc" digi stamp and the sentiment,  then I printed the image on X-Press Blending Card paper.
Before to start my Copic Markers Coloring I masked all the elements and I realized the wall and the floor using the Distress Oxide inks and the Life Changing Blending brushes,
The rest of the image  and the doctor are colored with Copic Markers,  finished with prismacolor pencils and some touch of white gel pen.


Quando comprerete il timbro otterrete sia la versione.png che  quella.jpeg più  un'altra dai bordi molto soft perfetta per la colorazione con la tecnica  "no lines"

Spero che la mia card vi sia  piaciuta e che la troviate spiritosa, perché questo era l'intento:-P
 Grazie per la visita 

When you'll buy the stamp you will obtain the .png and .jpeg version and an other one with soft border perfect to color in no lines technique.

Hope you like the card, and have fun to watching at it.
Thanks for stopping by
Ciao ciao

venerdì 6 aprile 2018

Dew drops on Cherry blossom

Ciao a tutti!
nuovo mese significa nuovo challenge in casa MAKE IT CRAFTY! e Zoe, per questo mese a pensato di sfidarci a colorare le "gocce di rugiada"
Posso immaginare, che detta così, la cosa vi spaventi, ma vi assicuro che é davvero semplice da fare.
Vi giuro che anche io, nonostante mi fosse già capitato di colorare qualche goccia di rugiada, ero spaventata, perché volevo volevo molte goccie di rugiada e farle sembrare realistiche nell'insieme.
Ogni challenge rappresenta, per me, una sfida con me stessa ad uscire fuori dalla mia confort zone, e ad apprendere conoscenze sul disegno, sulla colorazione, e questa volta sulla rifrazione della luce sulle gocce d'acqua.
Diciamo che mi piace prepararmi anche sul piano teorico:-))
Comunque, nel post che challenge, Zoe ha incluso un paio di tutorials per mostrarvi come fare, ma potrete trovare molti esempi anche nel web.

Hi ladies!!
New month means new colourful challenge at MIC's house! and for April, Zoe, challenge us to color
"dew drops".
I can imagine this theme can worried you but I assure you is very simple to do.
Me too, despite I had already color dew drops, was worried about it, because this time,
 I challenged myself to go out my confort zone: this means color many, many dew drops make them look realistic.
In the challenge post, Zoe, has included a couple of video tutorials to show everyone how color them, but you could find many examples on the web too.

Per la mia card ho usato  il  timbro digitale "Cherry Blossom"   colorato  con le matite Prismacolor Strathmore toney gray paper aggiungendo come sentiment la chipboardt  Thanks  (2,5 inches)  e il piccolo  banner by Mama Elephant.

For my card I used the "Cherry Blossom" digi stamp,  colored with Prismacolor pencils on a Strathmore toney gray paper adding as a sentiment, a Thanks Chipboard (2,5 inches). and a little banner by Mama Elephant.

Come ultima cosa, ho spruzzato, con l' ausilio di un pennello, dell' acrilico bianco su tutta la colorazione... credetemi, ragazzi , fare questo mi ha richiesto molto, molto coraggio!
Avevo paura  di rovinare tutto!

As a last thing I splattered the acrylic white paint all over the coloring... trust me, guys, did it took a lot of courage!
I was so scared to mess it up!
Dopo aver letto tutto questo bla, bla, bla, spero di avervi ispirate e che vogliate provare a sfidare voi stessi, partecipando al  MIC di aprile.

After reading all this blah, blah, blah I hope I inspire you and you'll challenge yourself playing with us at the  MIC April challenge.

Buon fine settimana!
Have a  great weekend!

Ciao, Ciao
SalvaSalvaSalvaSalva
giovedì 15 febbraio 2018

Say it with Flowers


Ciao a tutti!
Quest'anno mi ero illusa che l'influenza avesse graziato questa casa, ma mi sbagliavo ..sono ormai 4 giorni che mi trascino e non vedo chissà quali  miglioramenti! però sono stufa di starmene inerme perciò approfitto dell'effetto delle medicine per dare un po' di colore a questa giornata:-)
Oggi vi mostro le cards realizzate usando la nuovissima  flowers collection by Make it Crafty;
E' assolutamente meravigliosa e posso affermare che questa é la migliore collezione floreale di timbri di sempre e voi ve ne innamorerete come fatto io:-)
È costituita da varie immagini pre composte (come quelle che ho usato io) e da a molti singoli elementi che permettono di comporre  moltissimi arrangiamenti con l'ausilio di un programma di testo o di foto ritocco. 
Zoe usa Word e ha fatto un tutorial per tutti noi disponibile gratuitamente qui ; così non ci sono scuse per non provare:-)
Ecco le mie cards:

Hi everyone!
I'm thinking the flu would not come to my house, but I was wrong!  I've been sick for 4 days and I'm not going to get better! it's so boring to lie on the sofa for all day so I use the momentary effect of medicines to give some color to this day.
is Nicoletta here today to share the latest creations using the new flowers collection by Make it Crafty;
It's absolutely amazing and I can say it's a best collection flowers ever and you will love this just like me:-)
It's composed by pre-made flower images (like those I used) and by many single element to compose so many, many arrangements  with a text or photo editor.
Zoe, use Word and she did a tutorial for all of us, available free here in the store ; so no excuses for not trying:-)
Here are my cards:


Come  ho detto prima, ho usato un' immagine già composta chiamata
 e l'ho  colorata in due versioni:
 la prima con i Copic markers e la  seconda con le matite Prismacolor.
 Le adoro entrambe ma quella che ho colorato con le matite mi ha dato davvero una grande soddisfazione.
 Vi mostro  tutti dettagli così mi potrete dire quale delle due vi piace di più.
Ecco la prima con i Copic markers  su carta bianca:

As I said before i used a pre-made arrangement called
 and I colored in two versions:
the first one with Copic markers and the second one with Prismacolor pencils.
I love both but that I colored with pencils give me a great satisfaction.
I'm sharing with you all details so you could tell me which one you like more.
The first one with Copic markers on white copic paper:


La seconda con le matite Prismacolor su carta Toned Grey della Strathmore:

The second one with Prismacolor pencils on toned gray paper by Strathmore:


MIC products:


Anche per oggi tutto !
grazie della visita e  presto

And that's that for today too!
Thanks for you time

Ciao

giovedì 16 marzo 2017

Believe in the magic

Ciao a tutti! 
oggi voglio condividere con voi la card di ispirazione che ho realizzato per il blog di Make it Crafty

Hi everyone!
today I'd like to share with you my inspiration card  for the Make it Crafty blog. 

Ho usato il delizioso timbro digitale ENCHANTED MERMAIche potete trovare nello shop a soli  1 $ per tutto il mese di marzo.

 I used the lovely
ENCHANTED MERMAID digi stamp you can find  in the shop for only $ 1.

Come prima cosa ho creato la base della card utilizzando una bellissima dies Mama Elephant, colorandone i vari pezzi in varie tonalità di blu e turchese con i distress inks.
Dopo ho stampato la sirena su carta kraft e l'ho colorata con le matite prismacolor,
L'effetto glitter l'ho creato con penne gel glitter e una bianca.
Fatto ciò, poi ho pazientemente, ritagliato l'immagine e l'ho incollata in 3D allo sfondo.
Alla fine ho aggiunto alcune sequins  e la chipboard, sempre MIC.
Ecco i dettagli della colorazione

As a first thing I create the card background using a Mama Elephant die and coloring all pieces with various shades of  blue and blue-green, with distress inks.
I print the mermaid on kraft paper, I colored all  with prismacolor pencils and I create with glitter pens and a white gel pen.
Then, patiently, I cut out and added her on 3D on the card.
As a last thing I added some sequins  and the MIC believe chipboard colored with copic markers.
Below the coloring details:


MAKE IT CRAFTY PRODUCTS:


E per oggi é tutto.
Spero che vi sia piacuta:-)
grazie della visita!

I hope you like it!
Thank you for your time!
xx


SalvaSalvaSalvaSalva

mercoledì 9 novembre 2016

A sparkling princess


Ciao a tutti
oggi sono molto contenta di potervi mostrare la mia ultima card, nella quale potrete notare molti glitter;-)
Mi sono davvero divertita tanto!
Ma ecco la card

Hi to everyone!
I'm very happy today, because I have a new card to share with you,in which I used a new technique
to add glitter to my coloring.
I, really,  had very fun...
here the card


Ho colorato Fairest of  All Princess digi stamp  by Make it Crafty con le matite prismacolor e dopo ho aggiunto glitter alla gonna della nostra principessa, con alcune penne glitter e una penna gel bianca come ho visto fare dal fantastico artista Maxx Stephan.
L'immagine é colorata su carta craft, poi ritagliata e incollata su un cartoncino verde che ho usato come sfondo.


I colored Fairest of  All Princess digi stamp by Make it Crafty with prismacolor pencils and  then  I added glitter  to her  skirt  using  some glitter pens
and a white gel pens like the  awesome artist Maxx Stephan does.
The image is colored on  craft paper then cut out and glued on a green background cardstock.


Ecco alcuni dettagli della colorazione:

Here some coloring details:


Come ultima cosa, ho aggiunto il sentiment, e la card é stata così completata.

As a last thing, I added the sentiment  and card was completed.

Spero vi piaccia :-)

I hope you like it:-)


MAKE IT CRAFTY products:

Hugs and kisses


venerdì 28 ottobre 2016

A beautiful Witch


Ciao a tutti!
Siamo alla fine di questo mese di Ottobre e voglio salutarlo con un'altra card dedicata ad Halloween! ...lo prometto... sarà l'ultima per qust'anno!


Hi to everyone!
We're at the end of this mont and I want to say him bye bye with an other halloween card!  I promise.. the last for this year!


°Il timbro digitale di questa dolcissima streghetta  "Witchy Wanda" è uno dei miei preferiti e finalmente sono riuscita a colorarlo:-)
Ho colorato l'immagine, come di solito, con i copic marker e alla fine ho aggiunto qualche piccolo tocco con le matite prismacolor.
Dopo ho ritagliato il timbro e òìho incollato con il nastro biadesivo 3D alla card.
Lo sfondo é davvero semplice: l'ho realizzato sfumando su un cartoncino bianco, l'inchiostro distress ink nella tonalità del Wilted Violet, e creando un cielo nuvoloso con la mascherina da taglio "Puffy Cloud Border" dies by Lawn Fawn. 
Per rifinire la card ho aggiunto una cornice tagliata con "Stitched Rectangle Frame" dies by Lawn Fawn.
Mi é bastato aggiungere il sentimento e quale sequins e la card era finita.


This lovely "Witchy Wanda" digi stamps is on my favorite, so finally I was able to colour it :-)
I colored, as a usually, with the copic markers, and then I added some little touches of prismacolor pencils.
The I cut  the image out and I glued it with 3D tape on the card!
I made a very simply background blanding the wilted violet  distress ink on white cardstock.   The clouds are made with  the  "Puffy Cloud Border" dies by Lawn Fawn.
On the top of the card I glued a a die cut frame I made with the "Stitched Rectangle Frame" dies by Lawn Fawn.
I added the sentiment and some sequins and the card is finished:-)


Qui la lista dei copic che ho usato
Here the copic colours I used

Skin: E0000/E000/E00/E11
Hair: C3/C4/V17/V15/C2
Outfit: 110/100/C10/C8/C7/C6/c4/C3/C2/C1
B29/B28/B26/B24
V9/V17/V15/V12
Broom:Y19/E59/E57/E55

Make it Crafty products
Spero che vi sia piaciuta;
intanto ne approfitto per augurarvi un bel fine settimana e soprattutto un


I hope you like it and I want to wish you a beautiful weekend and a

HAPPY HALLOWEEN!

Hugs and kisses

sabato 15 ottobre 2016

Surviving Mummy

Ciao a tutti!!
oggi sono qui per condividere con voi la mia nuova card a tema Halloween!
sono abbastanza contenta del risultato perciò potete immaginare quanto mi sia divertita a colorare questa scena.

Hi to everyone!
I'm  here, today, to share with you my new Halloween card!
I'm happy enough about the results so you can imagine how fun I had coloring this scene!
Ho scelto due timbri digitali della collezione Halloween by Make it Crafty e li ho combinati tra loro, con word, in modo da creare la mia scena.
l'idea era di creare uno sfondo simile a quello fatto da Zoe in questo video, così ho usato gli stessi colori di copic markers che usato lei.
La differenza tra i due lavori é che io ho colorato su carta kraft e sia i timbri che la luna sono colorate con le matite Prismacolor.
Ho aggiunto qualche  tocco di matite anche nello sfondo e infine, per dare energia alla luce, che proveniva dal dietro, ho usato una penna gel bianca.

I chose two MIC digital stamps of Halloween collection and I created my scene merged them in word.
The idea was to create a background as Zoe did in this video, so I used the same copic colours.
The difference is that I colored on a kraft paper and the stamps and the moon are colored with Prismacolor pencils.
I added some little touch of them in the background too.
As a last thing I added power to the highlights with a white gel pen.


Colours I used:
copic markers on the background
Prismacolor pencils

MIC products:

Spero che questo progetto vi sia piaciuto!
Grazie della visita!

I hope you like my project!
Thank you for you time!

xx

SalvaSalva

giovedì 14 luglio 2016

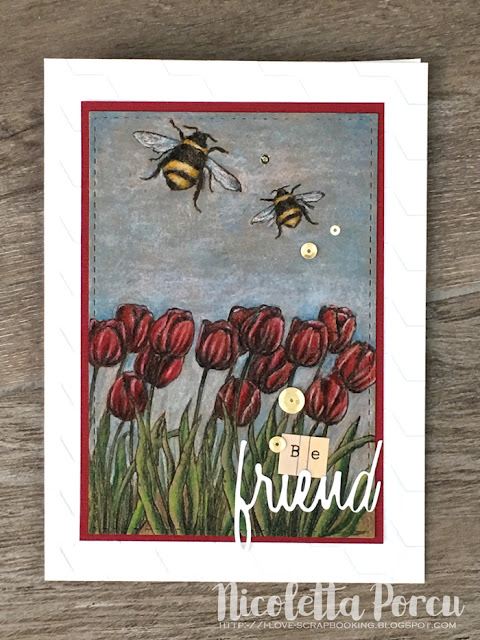
Be friend


Ciao a tutti e ben ritrovati!
Come state? immagino molti di voi siano già in vacanza e qualcuno le stia aspettando con ansia!
Qui il caldo si fa sentire parecchio e la voglia di creare latita:-)

Oggi però sono riuscita a terminare  un' altra creazione fatta con i deliziosi timbri Shaky A.!
Questa volta ho usato le "apine" cha fanno parte della plate B "Vintage Message" e la plate B "Fatina e Fiori".


Ho stampato il tutto su carta kraft , mascherando i tulipani , e poi ho colorato  con le matite prismacolor e ho rifinito i tulipani e le ali delle api con un tocco di "wink of stella clear".

Ho embossato il background bianco con una placchetta a nido d'ape,  ho aggiunto il sentiment e qualche sequins ed ecco la card finita!


Con questa card vado ufficialmente in vacanza!!
ci rivedremo a settembre, qui su ShakyAStamps con tanti nuovi progetti!
grazie di avermi letta!
Buona estate!
smack!!

linktwin

Related Posts with Thumbnails

ShareThis