martedì 23 gennaio 2024

Go Wild!

Hi crafty friends! I'm  back with my second post as a guest designer for  Heffy Doodle.

I really love all the Heffy Doodle products and I had some difficult to choose the items to play with! at the end I decided for the cute animals and other stuff related to them to arrange my card!


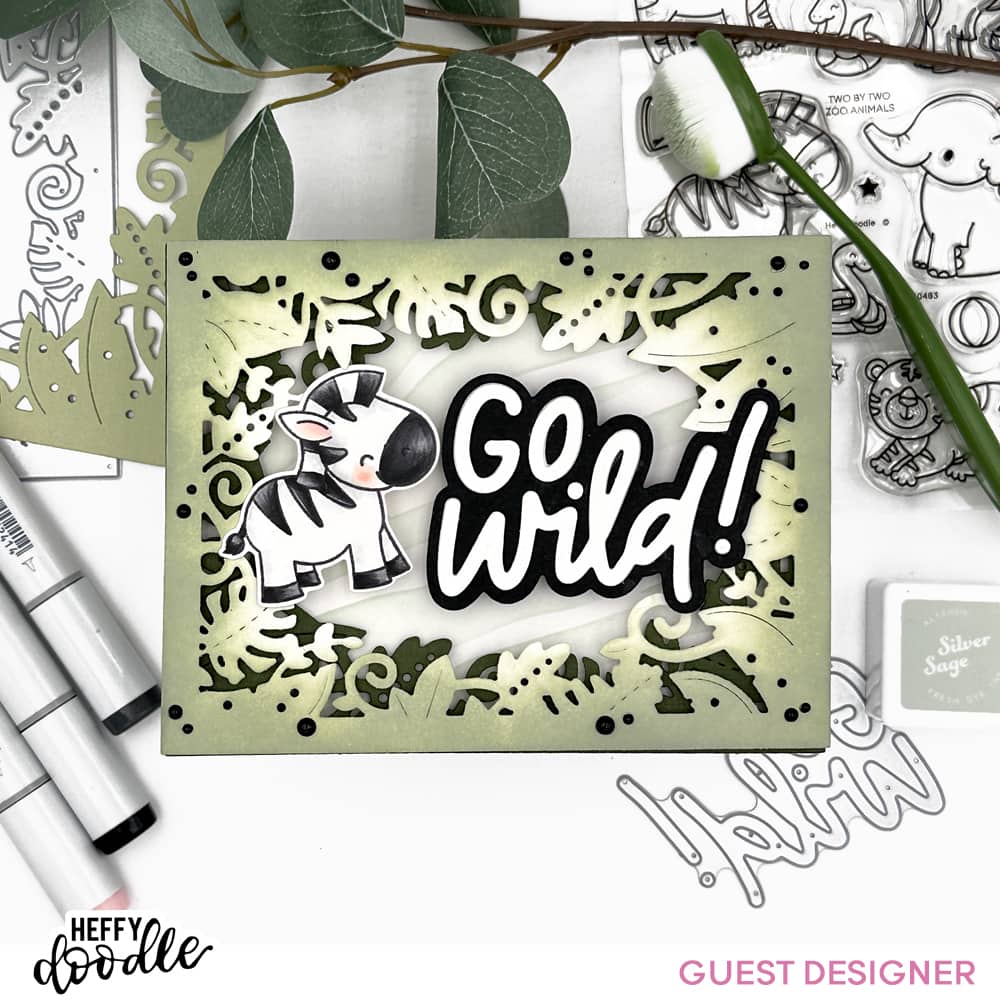
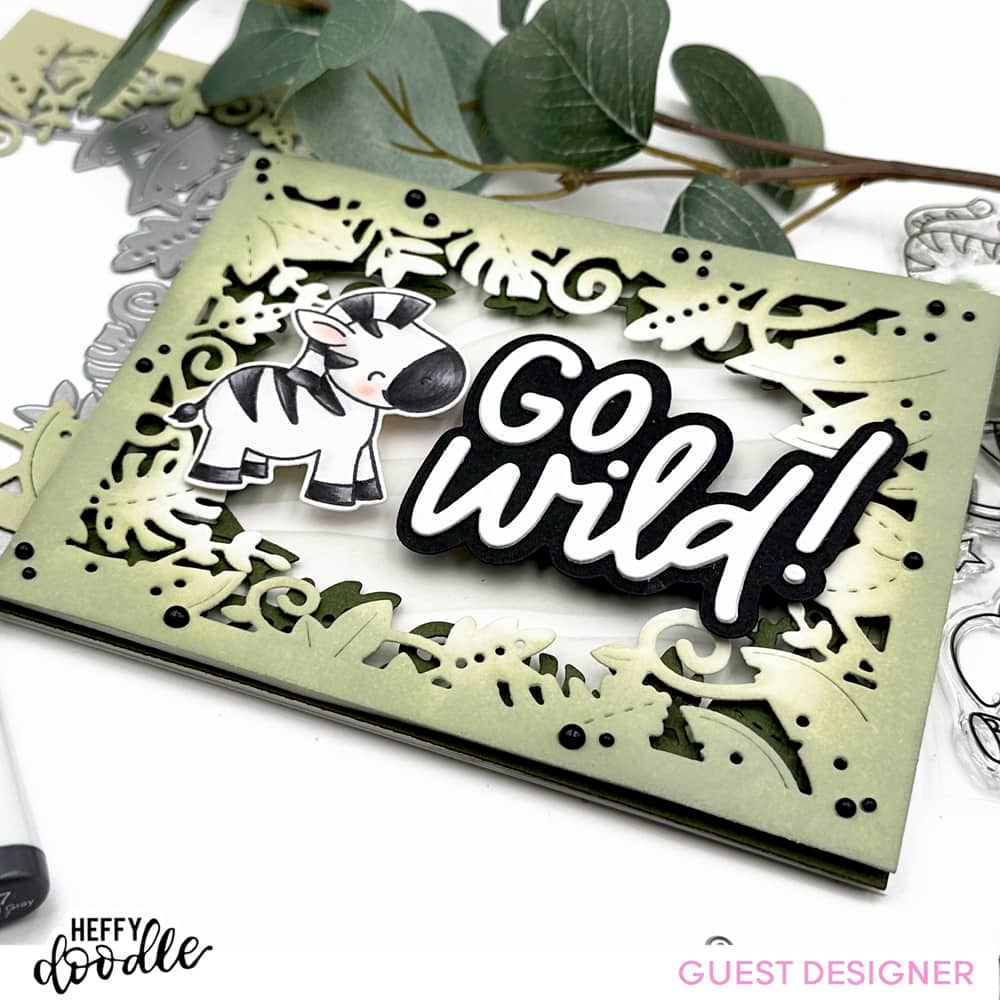
As a first step I stencilled the Zebra Stripe stencil on a piece of Neenah Paper using the Silver Sage ink and I die cut from it a 4 1/4" x 5 1/2" rectangle.

Then I die cut the 2 greenery frames using the Go Wild frame dies, the first one from dark green cardstock and the second one from a white cardstock previously ink blended using Silver Sage ink by Altenew and Bonded Sage Distress ink.

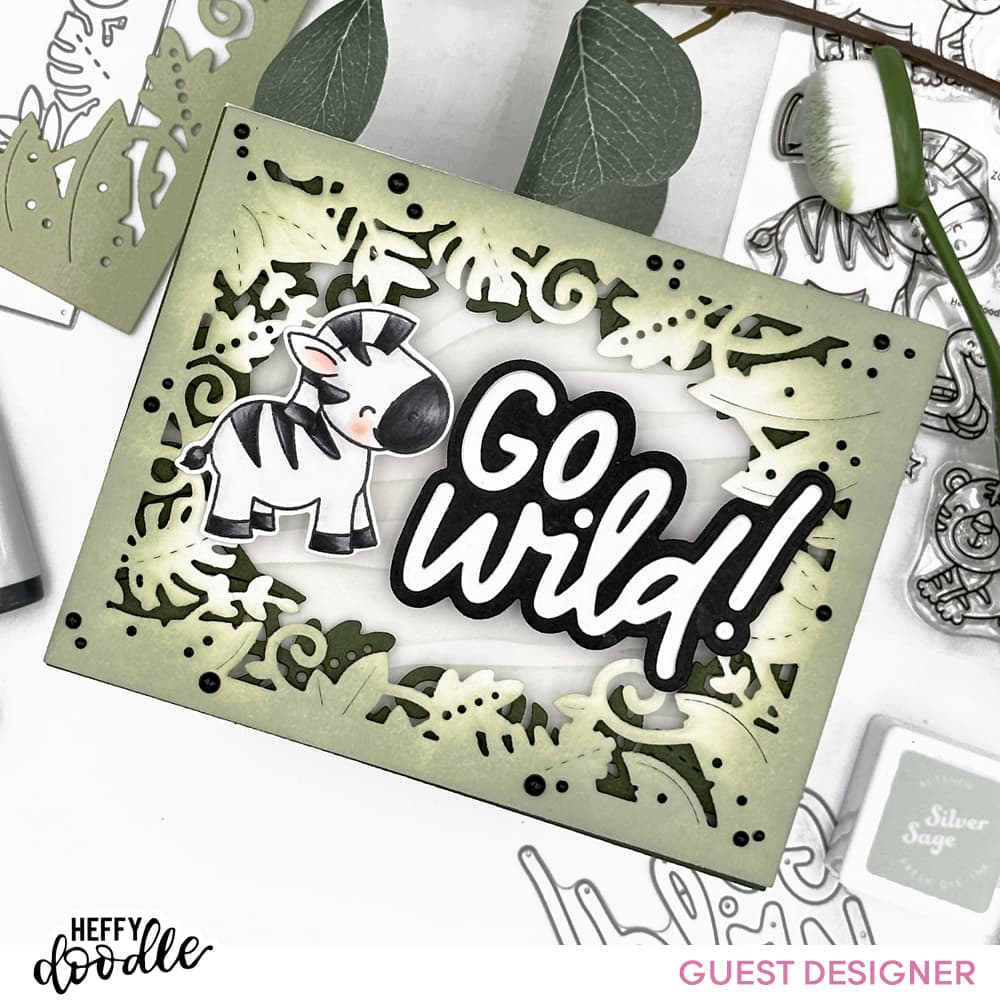
I continued by gluing the striped background on a A2 base card and over I added the two frames using mousse stripes to create dimension in every layer.

Next up I stamped the cute Zebra from the Two By Two Zoo Animals stamp set, I colored it with Copic markers and then I die cut it using the coordinate dies and I added it to my card using adhesive foam pads.

Here the Copic colors I used :

100/N9/N7/N5/N3/N0/R20/R000/0

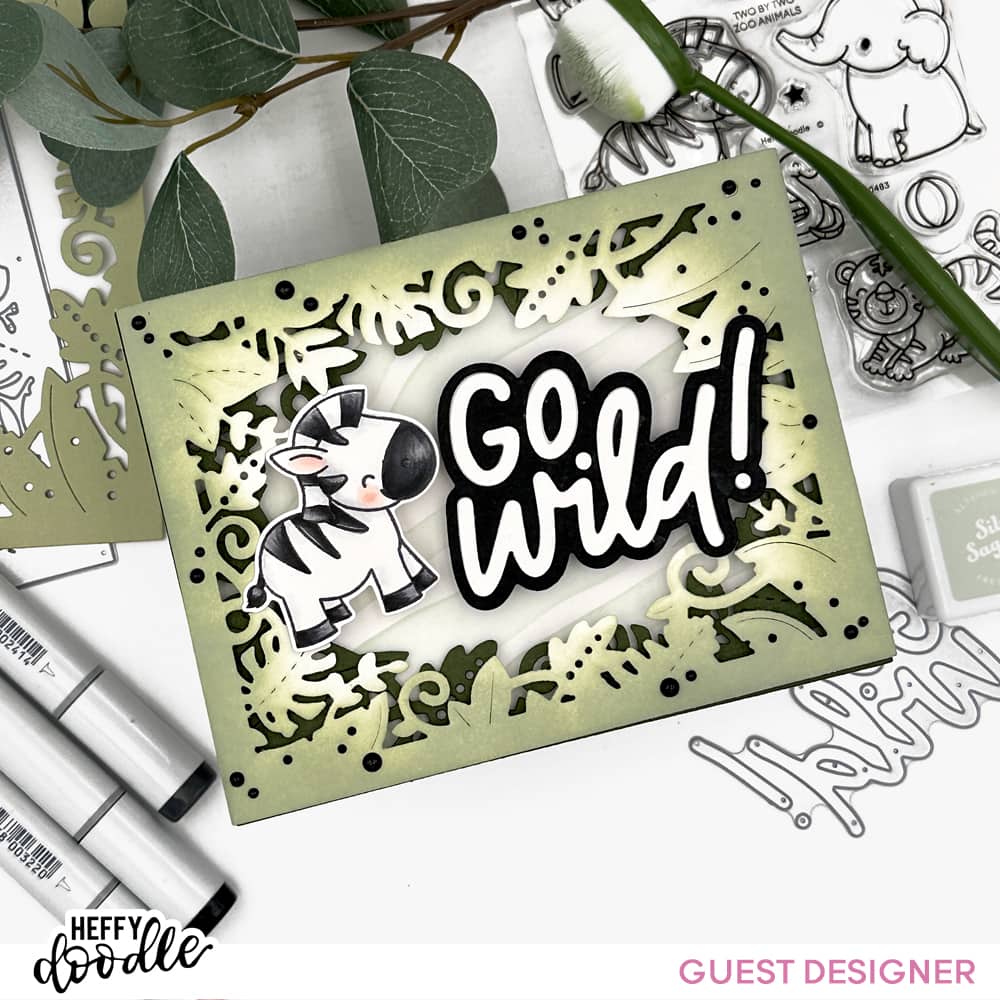
Then I obtained the big sentiment "Go Wild!" that is part of  Go Wild frame dies, die cutting the outlined shape in black and the top part in 3 white layers I glued all together to give a 3d effect. 

I added the sentiment on the card and as a last touch I added some black rhinestones all around the green frame.

That's it!

Hope you like this card and enjoyed your time here!

Thank you so much Heffy Doodle for having me as a part of your creative and talented family and thanks all you for stopping by!

xx

mercoledì 10 gennaio 2024

Celebrating with Flower

Hi Crafty friends!

It's Nicoletta here today with a new card to share with you!! and for once again it's a floral card!! I  know you like them as much as I do!

To make this I started by die cutting the Meadow magic cover die from a cream cardstock and I doubled it with a sugar paper. Next up I stamped the flowers and the leaves from the Watercolour Flowers stamp set, applying the ink with a brush to obtain an soft and watercolored effect and as I finished I die cut them with coordinate dies.


I placed all die cutting elements on the cream top panel  I applied gold glitters on the center of every flower.

As everything is dried I glued the floral composition to my cardstock card base and as last thing I added the Happy birthday sentiment I made by using the Birthday die and the string sentiment Happy from the Christmas sentiments stamp set.


And that's that!

Hope you like it!

Thank you for stopping by!

Nicoletta


martedì 9 gennaio 2024

You Are Plane Awesome - Guest Designer for Heffy Doodle

Hi crafty friends! I'm over the Heddy Doodle blog today  with my first guest designer blog post! I'm really excited  and I hope I could give you some inspiration to create with the amazing Heffy Doodle products.

As my first project I chose to make a shadow box card using the Big Shadow Box die and the Flying High stamp and die set to create a fun outdoor scene.

I started by die cutting the two main panels I needed to make the shadow box structure from a white cardstock and then I cut out a rectangle from the front panel. You may check the Heffy Doodle You Tube Channel to watch a video of the entire assembling process.

I continued by stencilling the front of my shadow box using the Funhouse Diagonal Stripes Stencil and the Tumbled Glass Distress Oxide and with the same ink I ink blended the back panel that will be showing in the inside.

Then I die cut all the elements I needed to put inside the shadow box (grass and clouds included in the shadow box die set ) and I assembled the box.

Nex up I stamped the images from the Flying High stamp , I colored them with Copic markers and I then die cut them with the coordinate die set.

As a last thing I added the images on my shadow box and that's that.

I hope you enjoy the reading time.

Thank you for stopping by!

xx

giovedì 28 dicembre 2023

Winter Birthday

Hi crafty friends!

Nicoletta here today with a new card!

I hope you had a wonderful and peaceful Christmas!  I spent these days with my loved ones and I collected sweet memories.... and I cooked soooo much!!  So today I was really happy to sit in my craft room to play with my stuff!

I have some birthdays during the holidays and I have this card in my mind for days and today finally I had the time to give birth to my idea.


To make it I started by blending a red and green Distress Ink on a piece of  Neenah paper and cutting it in the size 4 1/4 x 5 1/2.

I continued by die cutting the top panel of my card using the Snowflake Petals Cover die in 4 layers... I adhered the first  3 together, then I glued an acetate sheet and over the last snowflake petal layer and I put white glitters red stars confetti into the petal's shakers.

I plugged the shaker panel with the red and green blended paper and then I glued everything on a white card base.


As a last thing I added  a red hot foiled and die cut  sentiment  ( doubled in green)  in the center of the card and that's that.

(It's Your Birthday hot foil and  die set)


Hope I give you some inspirations!

Thank you for stopping by !!

Ciao Ciao

Nicoletta


venerdì 22 dicembre 2023

Joy to you and yours

Hi crafty friends!!

Christmas is just around the corner and I continue to create cards to wish happy holidays to my loved ones.

I made this card for a collaboration between Alex Syberia Designs and WOW! Embossing Powders.

Here is the card:

And now let me share something about the creative process.

I started to create my background... Using the Frosty Lace stencil set and the WOW! Clear Ultra Slow Drying embossing pad on a light pink cardstock I create a ton sur ton  and sparkling design. I die cut a rectangle from it using the Nesting Scalloped Frames die set and then I glued this pink background on a white card base.

Next Up  I die cut the Joyful Poinsettia from a very light rose cardstock and I blended the leaves with different shades of pink ink. and after that I added a Clear Ultra Slow inks on the border of the leaves and I heat embossed them using the

WOW! embossing powder Wanderlust.

I placed  and glued the flower composition on the card using some foam dots to add dimension and as then I added the big sentiment Joy .and the string sentiment.


Hope you like my card !

Thank you so much for stopping by!

If you want to see more:

@nicolettaporcu.design

Ciao Ciao

mercoledì 13 dicembre 2023

Happy New Year

Hi crafty friends!

It's Nicoletta here today with a new very simple festive and shining card! Hope I can inspire you!


To make my card I started by hot foiling the Brilliant Burst Hot Foil Plate using a platinum Foil over a black smooth paper. Next up I created my background card by  die cutting  a rectangle from the hot foiled black paper using the Nested Scalloped Frames die set ; I glued the black rectangle on a white card base.

I continued by thinking about the sentiment to put on my card,

I die cut the big sentiment "Happy New Year", three white  layers for the  outlined  sentiment and one for the Happy New Years words

I glued them all together and then I glued the sentiment over the card.

As a last thing I added many rhinestones to give shining  touches.

And that's that!

Soo simple !! Isn't?

Thank you so much for stopping by

Ciao, ciao


mercoledì 6 dicembre 2023

Noel

Hello crafty friends!

I'm here today to share with you another cards featuring the adorable Holiday  Wreath  & Branch Stencil & die set from the new release and some other goodies from the previous collections.


To create this card I started by hot foiling in gold the Elegant Stripes Hot Foil plate on a white cardstock and die cutting it using the Nested Scalloped Frames die set. Then I glued it over a white card base.


I continued by stencilling the Holiday  Wreath  & Branch Stencil & die set  on a piece of  Neenah paper using some Altenew inks. As I said in my previous posts I really felt in love with layering stencil so I think you could see more cards focusing  on them.

Once the stencilled wreath and the bow are completed I die cut and glued them on my striped background.

As a last thing I added se big sentiment Noel on the wreath.  To make it I die cut the outlined Noel wording  4 white layers I glued all togheter and in one pink layers at the base I glued slightly staggered. The top "Noel" is in metallic gold cardstock.

And that' it!

Hope you like my card !

Thank you so much for stopping by!

If you want to see more:

@nicolettaporcu.desogm

http://i-love-scrapbooking.blogspot.com

Ciao Ciao

mercoledì 29 novembre 2023

Today is a new day

Hi crafty friends!

I'm here today with another inspiration card featuring the brand new products by Alex Syberia Designs.

In the Christmas collections isn't all about fairy, bauble and decorations but the flowers are a must too! and the MIDNIGHT BLOOMS collections is really amazing!


To make my card I started by   preparing the card base:  I  cut a blue Cardstock rectangle 3 1/4 "x 5 1/2" and I double it with a purple cardstock. Then I glued  it on a white card base.

Next up I continued by using the Midnight Blooms Stencil set, stencilling the beautiful flowers on a smooth white cardstock and once ready I die cut them with the Midnight Blooms die set.

I adhered the flowers on the card base using some foam pads to add dimension.

Then it was the time to use the Midnight Blooms stamp set and coordinate dies.

I stamped and  heat embossed the sentiment,  with a purple glitter powder... unfortunately it's not clear in the pictures... and I adhered it on the leaves.

As a last touch I added some purple rhinestones.

And that's that!

Hope you like it!

Thank you for stopping by!

Ciao ciao


venerdì 24 novembre 2023

Feliz Navidad - Alex Syberia Designs Instagram hop and new release

Hi crafty friends!
The brand new  Holiday release from Alex Syberia Designs in live!!  It's all about Christmas, and new year and you could find , cute mices, lovely flowers,  cover plates and amazing hot foil plates
There's sure to be something for everyone!
Check my instagram profile @nicolettaporcu.design to have all the info and follow the lineup  to see all the gorgeous inspirations by the design team.
But now let me share with you the card I made for the occasion!
To make the card I started by die cutting a red cardstock rectangle  using a rectangle from the Nested Scalloped Framed die set .
Over it I hotfoiled the gold stars using the Magic Stars Hot foil plate, and I added some white splatters using a brush and once they are dried I glued the red background over a white card base,
I continued by stamping the images from the Merry Christmice stamp set , I colored them whit Copic markers and I die cut everything with the coordinate dies and put them aside.


As a next thing I die cut the sentiment Feliz Navidad, the outline in white and pink and top in gold.
I glued them staggering the outlines to give more interest   and add dimension to the sentiment.

I glued on the bottom of the card and all around I add the lovely mixes and all the images I previously colored and die cut.


Hope you like my inspiration card !
Join us  to win fabulous prizes.
Good luck!
Ciao , Ciao

lunedì 20 novembre 2023

Alex Syberia Designs November Collection Blog Hop & Giveaway


Hello crafty friends!!!
Today, we are celebrating the launch of  Alex Syberia Designs new release with  a fun blog hop!!
The November release includes  clear stamps, hot foil plates,  dies and stencils.
I'm sure  there's something for everyone to love!
Joining with us  will see many inspiration projects made by the AS design team in the ASD blog post so you could appreciate the amazing collection. 
Let me share with you the card I made for the event, using some of the brand new products: the Joyful Poinsettia die set and the Noel hot foil plate.


A very simple card but I love how it turned out. 
To make it I starts by die cutting a dark green rectangle using the Nested Scalloped Frames die set and then hotfoiling in gold  the big Noel at the bottom of my rectangle. Under of it I stamped a string sentiment from the Christmas Sentiments stamp set using Versamark ink and hot embossing it in gold.

Next up I  glued the rectangle to a cardstock card base and I continued by die cutting the poinsettias and the leaves using the "Joyful Poinsettia" die set and glueing  them on the top of the green background.

Alex Syberia Designs is giving away a £85 ($100) gift certificate to 1 lucky winner and a £15 ($18) gift card to 5 winners. 

Open internationally. All 6 winners will be drawn from the entrants that have played along with this Blog hop by midnight BST November 26th, 2023. Winners will be announced on the Alex Syberia Designs blog 'Giveaway Winners' page on November 27th, 2023.

Below you will find the blog hop order; Comment on all stops on the hop for the chance to win a gift certificate as detailed above.

Previous stop: Lisa

Next stop: Sandi

Blog Hop Order:


Have fun joining us with this blog hop
I'm sure you will love the entire collection and the DT inspirations as much as I do!

Ciao ciao
xx

linktwin

Related Posts with Thumbnails

ShareThis