mercoledì 28 giugno 2023

Spring Garden

Hi crafty friends!

Is Nicoletta here with a new colorful card! I'm pretty satisfied how about it turned out! all these colors make smile and  I really hope the card can put a smile on your face too!


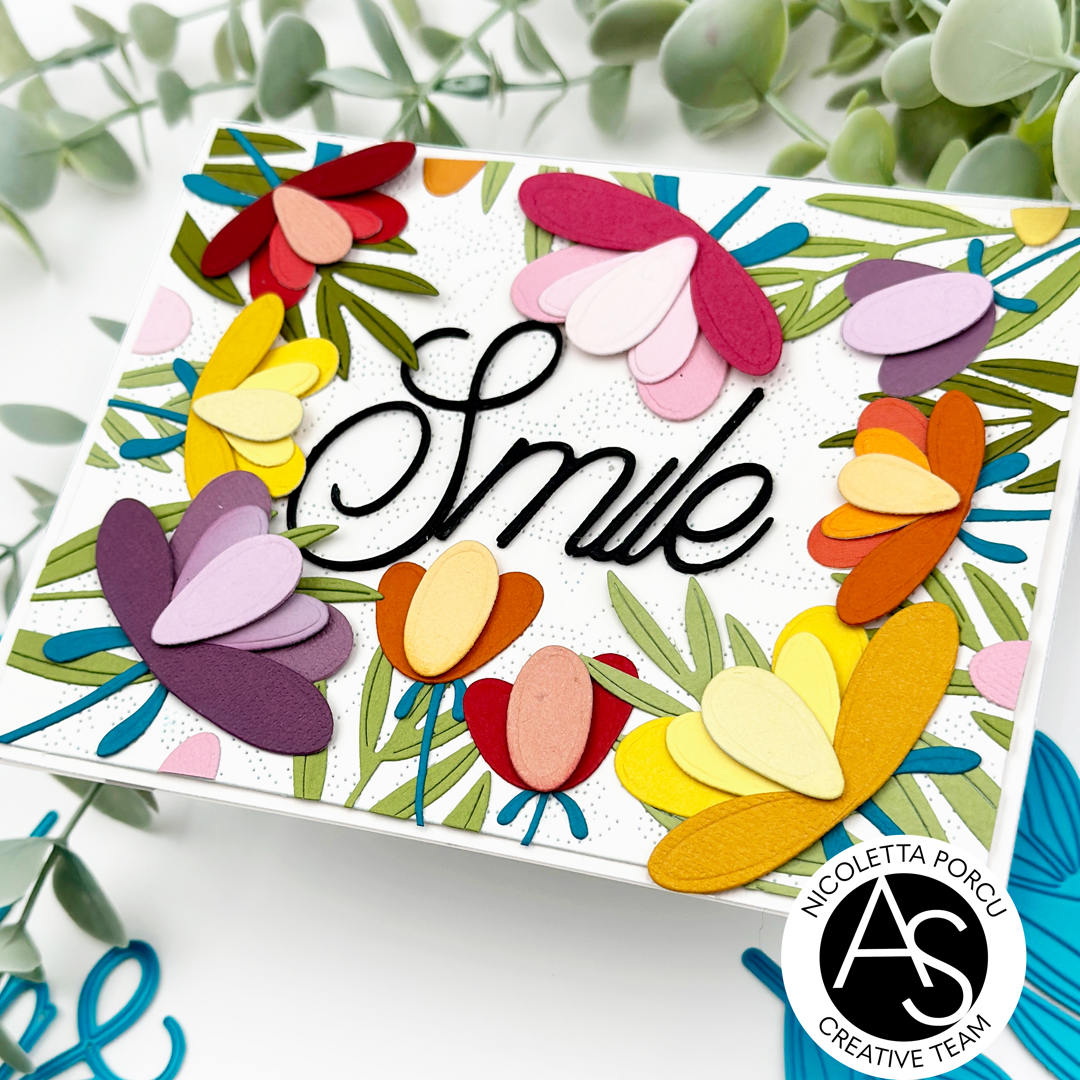
I started to work on my  white background  with the Meadow Magic Cover die  and once I die cut my textured panel I adhered it on a white cardstock base.

Next up I start to play with the Garden Tweets die set and I die cut all the flowers and leaves I needed in different colors. I assembled  them with mousse pads to give dimension and once finished I glued the leaves and the flower on the white base, arranging them on the sides.

I left the center for the big sentiment "Smile",  die cutting it ( from the same set " Garden Tweets") in black and in many layers I glued all together to add dimension.

And that's it!!

here some other pictures :


Hope you like my card!

Thank you for stopping by!

Ciao Ciao

giovedì 22 giugno 2023

Flowers with love

Hi crafty friends!

Today I  share with you a new card featuring some other products from the newest Sunkissed Memories release.

It 's time for a product  I absolutely love : the Chrysanthemum stamp set . This is a layering stamp set and it is composed by a large 4-step chrysanthemum flower and a 3-step leaf  to  create gorgeous and intricate flowers!! 


 I started  by choosing the red shades of red I needed and I simply enjoy by stamping the various flower and leaf layers !! It's really like a magic to watch the flowers pop out from paper!

Next up I die cut all the flowers and leaves using the coordinate dies : the Chrysanthemum die set.

I continued adhering the die cuts on a light blue card base , using foam pads to give dimension and as last thing I added the sentiment "With Love" made by foiling in gold the Love & Hugs Hotfoil Plates and die cutting it with the Love & Hugs Die Set.  I die cut the sentiment in many layers and I glued them together  and then I add it on the card.

That's it!

Hope you like my inspiration !

Thank you for stopping by!

Ciao Ciao


lunedì 12 giugno 2023

Underwater shaker card - Sunkissed Memories release from Alex Syberia Designs

Hi crafty friends!
The brand new "Sunkissed memories" release from Alex Syberia Designs in live and it is full of sunny critters and show stopping flowers! With hot foil plates, stamps, layering stencils, and dies there's sure to be something for everyone!
And after the blog hop today we celebrate with a fun IG hop so you could have another chance to win fabulous prized included the full release bundle.
Check my instagram profile @nicolettaporcu.design to have all the info and follow the lineup  to see all the gorgeous inspirations by the design team.


But now let me share with you the card I made for the occasion!

  
To make the card I used the following Alex Syberia Designs  products:


I start die cutting my top panel using the  Mermaid's Melody Cover die, then I cut out a circle in the top center and I colored the waves of the circle using Copic markers.
Next up I stamped, colored with Copic markers and die cut the  lovely images from the  Underwater Wonders stamp set.

As I finished I start to compose the card !
I glued the circle colored on the base card and over it I adhered the Pingu-mermaid , the fish , she shell and the others elements and in the center I put some rhinestones and beads to create the shaker window.

I continue by  gluing a piece of acetate on the back of the top panel and using foam tape I adhered the top panel over the card.

I add some elements at the edges of the circle window  and as last thing I added the "you" sentiment  I die cut in many layers gluing them all togher and coloring the top one with Copics. 
The little sentiment string is a prat of the Underwater Wonders stamp set.

And that's!!


Hope you like my inspiration and hope to see many of you joining in our instagram hop!

Remember to check my account
@nicolettaporcu.design
and the 
@alexsyberiadesigns account.

Thank you for stopping by!!!

Ciao ciao 


giovedì 8 giugno 2023

Alex Syberia Designs "Sunkissed Memories" June Release Blog Hop and Giveaway

Hello crafty friends!!!
Today, we are celebrating the launch of Alex Syberia Designs' new release with  a fun blog hop!!
The new release "Sunkissed Memories"  includes  clear stamps, dies, stencils and  hot foil plates.
I'm sure  there's something for everyone to love!


Joining with us  will see many inspiration projects made by the AS design team in the ASD blog post so you could appreciate the amazing collection.

Let me share with you the card I made for the event, using some of the brand new products: the Pengu-tastic Holiday stamp set and coordinate dies  the  Sunrays Hotfoil Plate and the Sunrays Stencil Set.
i
I started working on my backdrop panel so using the Glimmer Hot Foil Machine and the Spellbinders Platinum 6 machine  I heat foil the beautiful  Sunrays Hotfoil Plate on a  white cardstock. 
I used the coordinate stencils the Evergreen Bough and the Squeezed Lemonade Distress Oxide inks to add colors on some sunrays.
I glued the background on a white card base and then I used the Nested Scalloped Frames dies set to create a  white framed I added  it on the card using  foam adhesive to give dimension.


Next up I stamped the adorable Pinguin , the glassed and the umbrella from the Pengu-tastic Holiday stamp set , I colored  them with Copic markers and then I die cut everything using the  coordinate dies.
I continued by stamping and embossing in gold the string sentiment , even from the  Pengu-tastic Holiday stamp set and I glued it and all the images on the centre of card.

As a last touch I added the blue-green rhinestones and that's it!!


Alex Syberia Designs is giving away  two £15 gift cards to the ASD store and one full release bundle, valued at £400 ($495) in total. 

Alex Syberia Designs will pick the three winners from the comments left on each designer’s blog post in this hop before midnight BST on June 18th 2023. The winners will be announced on the ASD Release Blog Hop post on June 19th 2023

Blog Hop Order:


    Have fun joining us with this blog hop
    I'm sure you will love the entire collection and the DT inspirations as much as I do!

    Ciao ciao
    xx

    mercoledì 31 maggio 2023

    Happy birthday to the greatest mom

    Hi Crafty friends!  So happy today to share with you the card  featured on the May Creative Stamping Magazine!

    To make this card I started blending the Squeezed Lemonade Oxide ink over a piece of Neenah Solar white cardstock using a blending brush.Then I emboss it using  the Pureland Fan Stencil and using the  Nested Scalloped Frames I die cut the rectangle to be my background. 

    I glued it over a white card base and I continued stencilling the Gorgeous Peonies”  by Alex Syberia Designs in pink, orange, yellow and blue shades for the blooms and on green shades for the leaves using Distress inks. Then I die cut flowers and leaves using the coordinate dies and I glued them on the yellow background .

    Remember that when you use layering stencils to obtain crisp images be sure the  ink blended part o is  completely dry before continue with the following layer. To speed up the dry process you could use the heat gun after every layer.


    As a last step I foil in rose and die cut the sentiment ”Mom” using the “For Her"  hot foil plate and coordinate dies and I glue it over the flowers composition and in top of it  I add a the sentiment string from "For Her Sentiments" stamp set.


    And that's it!

    You could find more details about the making and the products I used on the magazine!

    thanks for stopping by !


    martedì 30 maggio 2023

    Heffy Doodle and Alex Syberia Designs Collaboration Blog Hop


    Welcome to the Heffy Doodle and Alex Syberia Designs Collaboration Blog Hop!
    Design Team members from both companies are sharing inspiration using products from both companies!


    To make the card I used the Paradise Birds Stamp set and the coordinate dies by Alex Syberia Designs and  the Stitched Birthday Trio Frame dies and the Ripple Waves Stancil by Heffy Doodle.

    I started creating the background. Using the stencil Ripple Waves and Distress inks I made the water effect, then with a blending brush I added the sand and sky shades.

    I glued the background on a teal cardstock base and then I framed  with the Stitched Birthday Trio Frame die

    Next up I stamped all the elements from the  Paradise Birds Stamp set  I colored everything with Copic markers and then I die cut them using  the coordinate dies.

    I placed all the elements on my card using in same of them  mouse pads to give dimension and as a last thing I die cute die big sentiment You in 3 layers. I glued them together and then I added it on the card.

    Over I added the little string sentiment( from  the  Paradise Birds Stamp set) I previously embossed in white.

    And that's it!

    I'm quite happy about the result!


    To be entered to win the giveaway, all you need to do is comment at each stop along the Blog Hop!

    Alex Syberia Designs and Heffy Doodle will be giving away £20 to their stores!  Be sure to comment before 11:59 PM EST on June 6th to be entered to win!

    Each company will post their random winner on June 8th at 10AM EST!  Make sure to check the Heffy Doodle Blog and Alex Syberia Designs Blog to see if you’re a winner!

    You should have come from Amanda Fitterer

    and the next stop is Natasha Davies


    Blog Hop Lineup:

    Heffy Doodle Blog

    Raquel Arribas

    Amanda Fitterer

    Nicoletta Porcu ---> you are here

    Natasha Davies

    Cheryl Espie

    Jordanna Channings

    Jarle Franceus

    Brenda Noelke

    Tallie Clewley

    Alex Syberia Designs


    Hope you like my inspiration card and  to see many of you joining with us in this fun blog Hop!
    Thank you for stopping by!!

    Ciao Ciao

    giovedì 25 maggio 2023

    Thank you for your kindness card featured in the Die Cutting Essentials magazine

    Hi Crafty friends!  So happy today to share with you the card  featured in the May Die Cutting Essentials Magazine!

    There is no need to tell you how I'm honoured about it !

    But let me tell you something about the making process!

    To make this card I started die cutting  the Floral Lattice Cover die from vellum and  gluing it over a white card base I previously lightly blended with Savage Patina Distress Oxide  and in whichI added  some gold ink splatters.


    Next up , using  the Classic Foliage die set, I die cut  the leaves from a teal cardstock and the flowers using  the   Fantasy Flowers die set.

    I die cut the base of the flowers from   different  colour  papers  , the inside in black and glittered gold , and the top petals in white  and I colour them with Copic markers adding shades and dimension.

    I continue gluing all the flowers and leaves on the card base and as a next step , using the "Expressing Gratitude Sentiments" stamps and dies ,  I stamped, embossed in gold  and die cut the sentiment. I placed it over the card and as a last touch I add some gold rhinestones.


    And that's it!

    You could find more details about the making and the products I used on the magazine!

    Hope I giving you some inspiration vibes:-)

    thanks for stopping by !

    Ciao Ciao

    martedì 16 maggio 2023

    Heffy Doodle and Alex Syberia Designs Collaboration Instagram Hop


    Hey crafty friends!  It’s time for a fun Collaboration Insta-Hop with Heffy Doodle & Alex Syberia Designs!  Get ready for amazing inspiration from both talented design teams!  But that’s not all!  Both companies will also be giving away £20 PRIZES!  It’s super simple to enter to win - just leave a comment at each stop along our crafty lineup by May 23, 2023 at 11:59 PM EDT.  Winners will be announced on the @heffydoodle & @alexsyberiadesigns IG accounts on 5.25.23!


    My card features Special Delivery stamp set and coordinate die set from Heffy Doodle and Nested Scalloped Frames die set and Always Be Yourself stamp set from Alex Syberia Designs.


    To enter our Instagram hop make sure to visit our Instagram profile following the lineup below.


    IG Hop Lineup:

    @heffydoodle

    @jordyscards

    @mypapercutcreations

    @talliescrafts

    @cardsmadebynatalia

    @nicolettaporcu.design←– You are here

    @handmadebytasha13←- GO HERE NEXT!

    @rachelrdesigns

    @craftyandcreativevibes

    @cherylespiecreates

    @alexsyberiadesigns

    .

    This giveaway is not associated with or sponsored by Instagram or Facebook, and you must be 18 or older to be eligible to enter or win.

    Please note that all prize gift vouchers are valid for 3 months from date of issue. Prizes must be redeemed before the expiration dates.


    But let me show you in details the shaker card I made using the products of both companies!


    And that's it
    Hope to see many of you joining with us in this fun IG hop!!

    Thank you for stopping by!

    giovedì 11 maggio 2023

    Rainbows and unicorns

    Hi crafty friends!

    I'm  here today to share with you a new card featuring the new collection products!

    I'm so happy about the result and I hope you like it too! but let me show you!


    To make this card I used the Joyful Rainbow Stencil set,  the Always Be Yourself stamps set and his  coordinate die set, the Rainbow Sentiments stamp set  and his coordinate dies, the Glowing Geometry Hot Foil Plate and the Nested Scalloped Frames die set.

    I started   die cutting a scallop rectangle from a lilac cardstock using the Nested Scalloped Frames die set ,  then embossing it using the   Glowing Geometry Hot Foil Plate as embossing folder and gluing it over a white cardstock base card.  The white  base is smaller than the lilac background because I didn't want it was visible.

    As a next step I die cut a rectangle from a piece of Neenah paper and over  I stencilled the  Joyful Rainbow Stencil  using a soft pink ,  lilac  and grey inks and heat embossing in gold the middle arch. I continued embossing,  die cutting the "love star" from the Rainbow Sentiments stamp set and  gluing it at on side of the rainbow.

    Below I stamped the sentiment "Dream Big" and all around the little pink and black stars .

    Next upI glued the decorated rectangle over the card using foam pads and them  I printed , die cut and colored  the sweet unicorn from the Always Be Yourself stamps set  and the string sentiment from the Rainbow Sentiments stamp set .

    I glued them over the card with foam pads  to give dimension and as a last touch I added some gold little stars.

    And that's it!

    Hope you like the card and hope I give you some inspiration!

    Thanks for stopping by!

    Ciao Ciao

    giovedì 27 aprile 2023

    Petit periwinkles sending love

    Hi crafty friends! Nicoletta here to share another card using products from the last and amazing release "Time to Choose Magic"!


    I started  hot foiling the background of my card  using the Glowing Geometry Hot Foil Plate and a teal foil. Next up I used one of the rectangle dies from the Nested Scallop frame Die Set to cut out the background panel and  from it an other rectangle out of the foiled panel and then I glued both of them on a light rose card base. I used the adhesive mousse pads for the make the smallest rectangle pops.    

    I continued ie cutting the little flowers and leaved using Petit Periwinkles Die Set and I glued everything over the card. Next up I foiled the sentiment  using the For Her sentiments Hotfoil plate and die cutting it in many layers with the For Her sentiments die set. Once I glued the layers together I add it on the flowers composition.


    And that's it! Hope you like my card! Thank you for your time.

    linktwin

    Related Posts with Thumbnails

    ShareThis