giovedì 30 marzo 2023

Have an eggs-cellent Easter

Hi crafty friends!

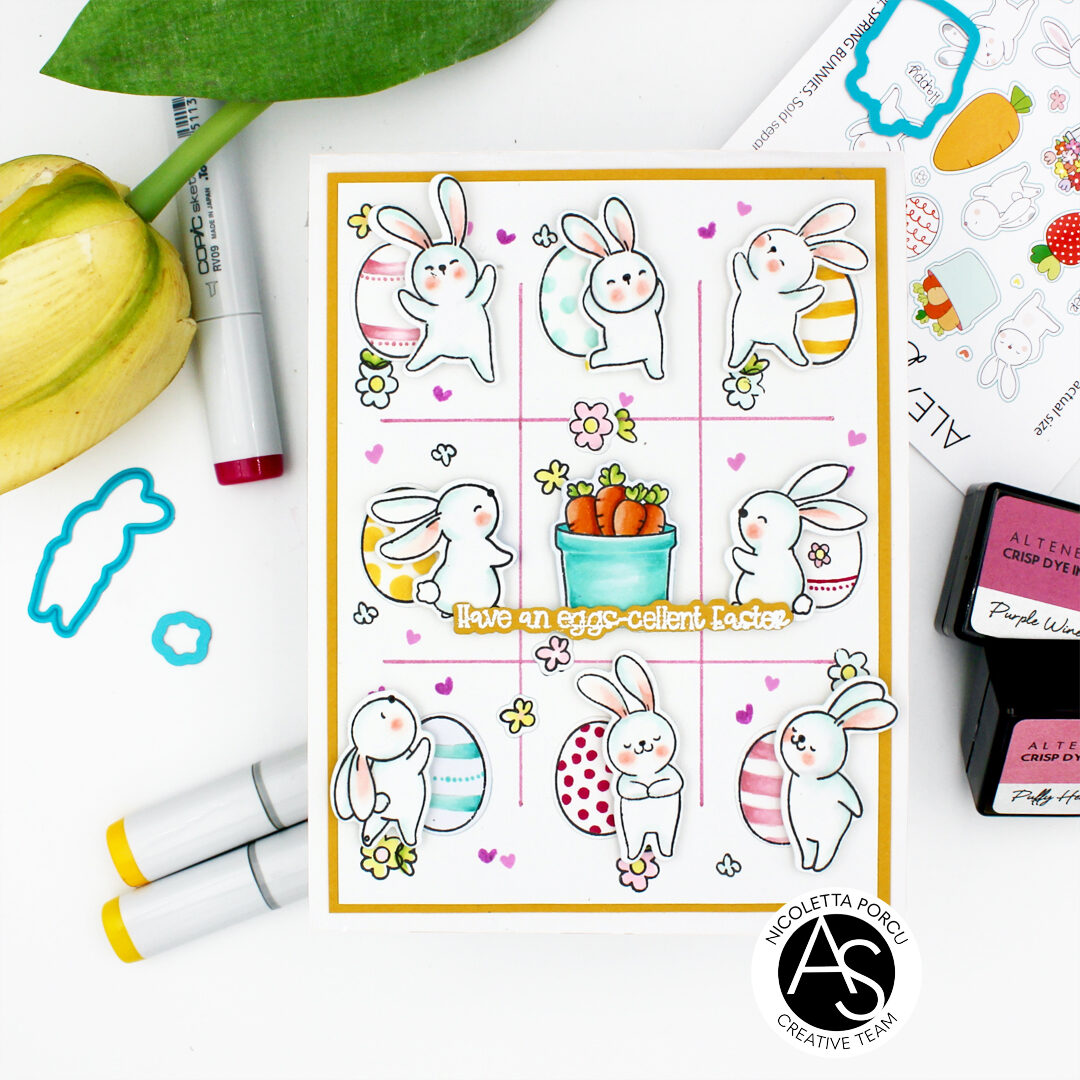
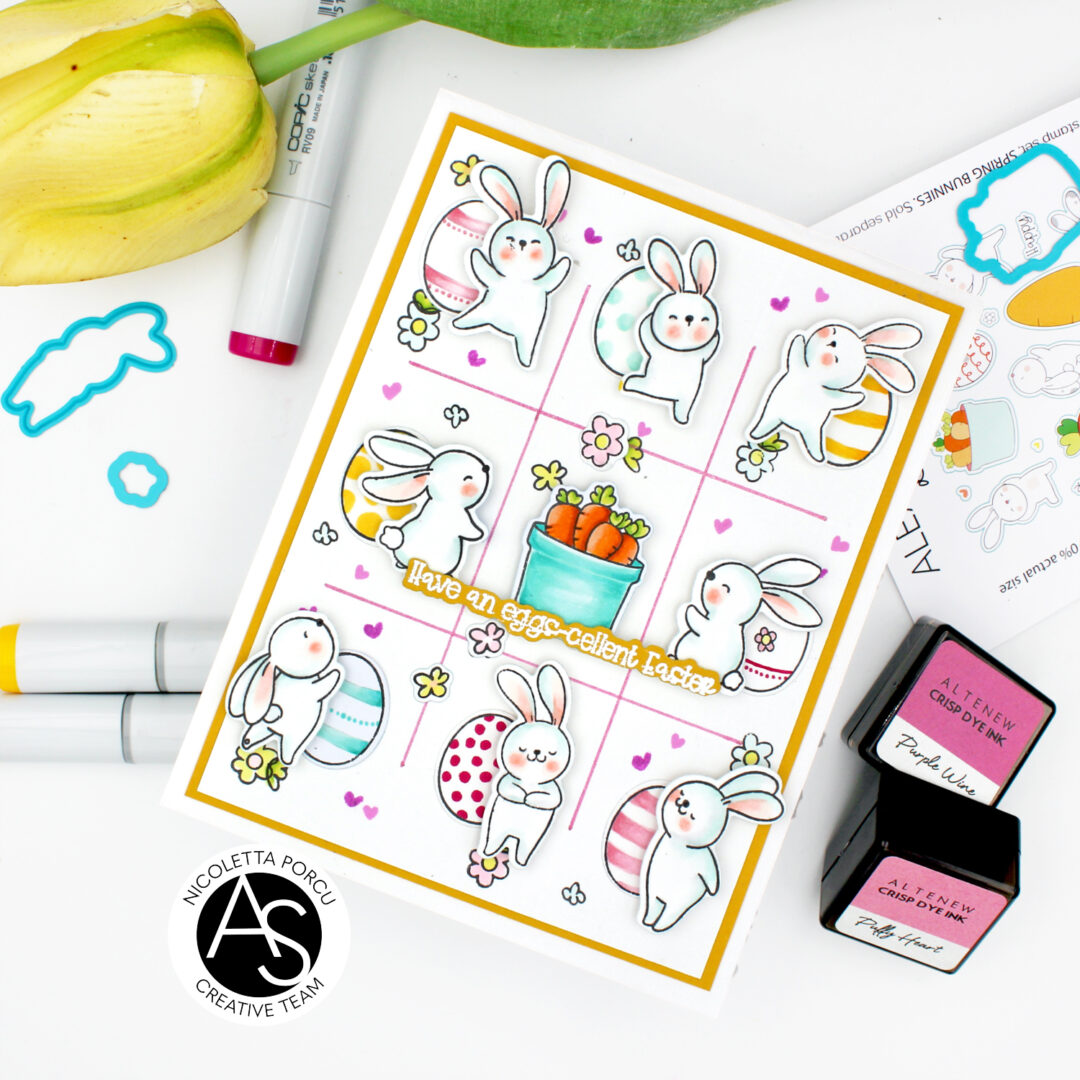
today with a new inspiration card using the lovely Spring Bunnies stamp set and the coordinate dies.

Easter is just around the corner and this set is perfect for the occasion!!

Let me show you the card and tell you about the making process!

How much fun making working with these cutie bunnies!

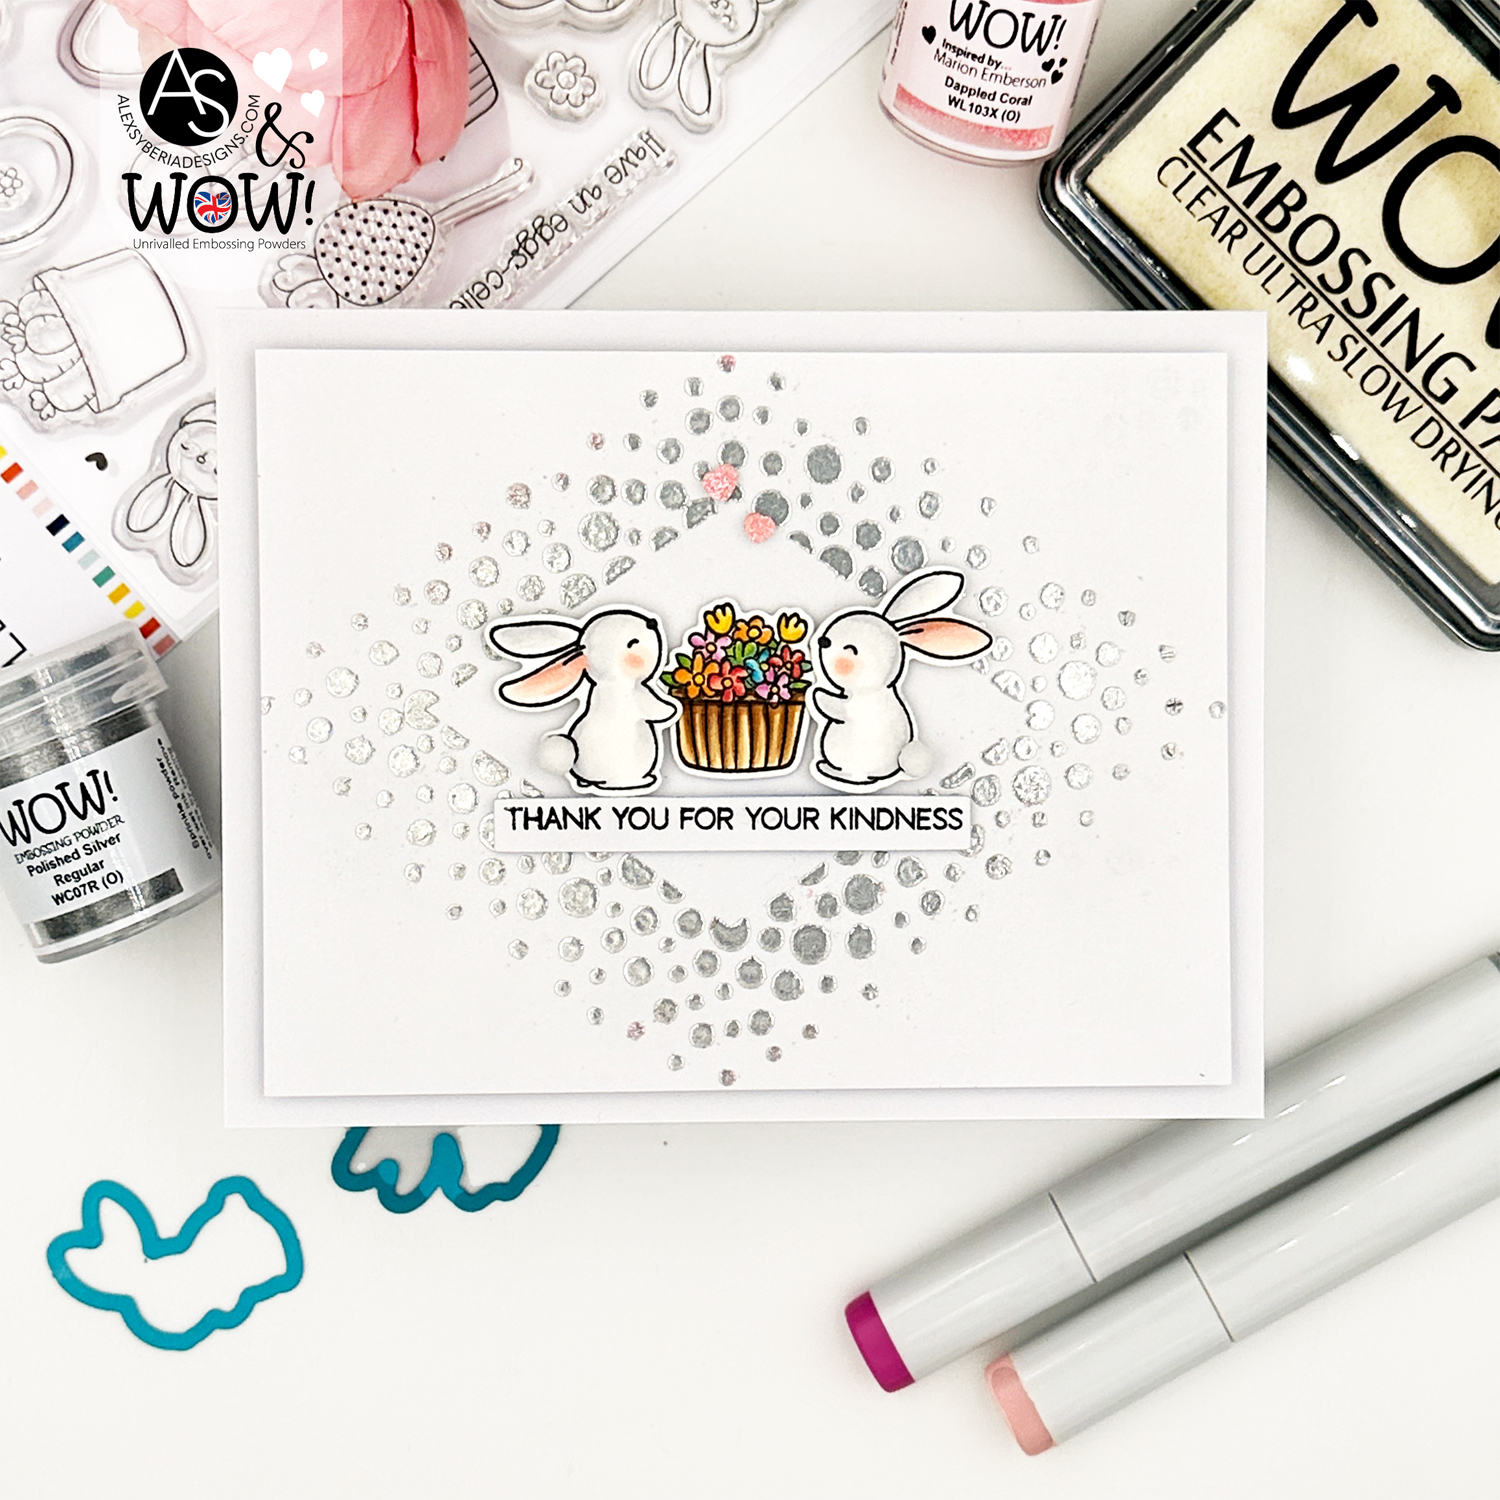
To start I cut the  rectangle for the top card (4" x 5 1/4") and I divided it in 9 parts using the score board . With a metallic pink gel pens   I colour the score marks as to create a Tetris scheme.

Then I matted the top card with a yellow cardstock , I glued all on the white base card and the top I stamped and colored some little flowers and hearts,  so the my background is ready.

Then I stamped the all the elements I needed from the "Spring Bunnies" stamp set  on the Neenah  cardstock  coloring them with Copic markers. Once I finished I die cut  them  with the Spring Bunnies coordinate dies  and I glued  the eggs and the bunnies on  the card.

As a last thing I stamped and embossed in white the little sentiment.

I admit this card takes me some time but I 'm so happy with the result!

Hope you like it too.

Thanks for stopping by and reading me .

Ciao ciao


mercoledì 22 marzo 2023

Poppies for your birthday


Hi crafty friends!

Nicoletta here today with  a new inspiration card featuring the Cindy Lou's Poppies stamp set and dies and the the Birthday wishes stamp set and dies.

To make the card I started from the background using the Spun Sugar, the Kitsh Flamingo and the Picked Raspberry Distress Oxide inks .

Then I stamped all over the background the poppies and flowers from the Cindy Lou's Poppies stamp set  and I embossed the gold using the WoW! Embossing powder called Fool's Gold.

Then I printed  and embossed  the big sentiment "it's Your" over a piece of paper perviously inked with Picked Raspberry Distress Oxide.

I die cut is using the coordinate die and I doubled it many times with  a white cardstock and  with different shades of pink cardstocks to create a colorful trail.

I printed and embossed the little sentiment "birthday! and I glued them over the top panel.

As a last touch I added some gold pearls.

And that's it!

Hope the card can inspire you !

See you soon!

ciao ciao


giovedì 16 marzo 2023

Love from me to you

Hi crafty friends!

today I share with you  with you a cute card I made using the Giraffe-ic Friends stamp set and the relative dies by Alex Syberia Designs.


I started the card creating a colorful background . I wanted something that remind me of  the Savanna sunsets, so I chose a Distress Oxide ink combo with the Wild Honey, the Spice Marmalade and the Seedless Preserve colors.

Then I stamped all the images I needed  (from the Giraffe-ic Friends stampon a X-Press Blending card and I colored everything with Copic Markers.

Once I finished I die cut all the images using the Giraffe-ic dies set and I started to compose my card.

First of all I glued the elements on all the  background sides and  I cut out all the protruding parts; then I glued the front panel on  white card base and I continued adding all the images I previously colored.  To add dimension  I used some  foam adhesive pads .


The Copic colors I used:

Giraffes: YR24/YR12/Y23/Y21/E50/R20/110/W9/W7/W5

Bushes: BG78/BG75/BG72/BG70

Foliage: YG67/YG63/YG61/YG99/YG97/YG95/YG93/YG91

Flowers: RV66/RV55/RV52/YF24/Y19/Y15/Y13/Y11


I complete the card adding the little sentiment I doubled whit a little string  blended with the Seedless Preserve distress Oxide ink.

And that's it!!


I can admit I love these adorable Giraffes and I'm quite happy about my card!

Hope you like it too !!!

Ciao ciao

giovedì 2 marzo 2023

Spring Bunnies

Hi crafty friends!
today I share the card I made for the collaboration  with Alex Syberia Designs and WoW Embossing Powder!
We are celebrating with an  IG hop so in with the chance to win fab prizes take a look at our IG accounts
@nicolettaporcu.design
@alexsyberiadesigns
@wowembossing


A clean and simple card today using the Spring Bunnies stamp set, the Spring Bunnies die set, the Express Gratitude stamp and die sets, by Alex Syberia Designs and the Polished Silver embossing powder and  Confetti Diamond stencil by WOW!

I started with heat embossing the background using the Confetti Diamond stencil and the Polished silver embossing powder .
Them I stamped the cute bunnies and the flower basket on X-Press blending paper and coloring them with Copic markers and die cutting them with the coordinated dies.
I glued the background on a white card base using adhesive  foam tabs  and over it I added the little bunnies , the basket and the sentiment.
As a bunny tail I added a little white pom pom. Isn't it so cute?


That's it for today!

remember to join with us at our Instagram hop!!


ciao ciao 

lunedì 27 febbraio 2023

Poppy Field

Hi crafty friends!

I'm  here today with a new card !

This is the time for the Cindy Lou's Poppies stamps set! I absolutely loved them!

But let me show you the card and let me know what do you think about!!


As a first thing I stamped the "Cindy Lou's Poppies" stamps set on X-Press Blending Card and I colored all the images with Copic markers. As I finished with coloring I die cut them using the "Cindy Lou's Poppies" die set and I put all aside.

Here the Copic colors I used:

R29/R27/R24/R22/R21/BG78/BG72/BG75/BG70/BG18

Then I started to work on the background blending some shades of Distress Inks Oxide on white cardstock. Once the desired result is achieved I sprayed the water  and as it was dried some splatters of black ink.

I used the following Distress Oxide inks:

Mermaid Lagoon

Peacock Feather

Evergreen Bough

Speckled Egg

 Using a piece of heavy cardstock I adhered the blended background on my white card base (to give a little bit of dimension) and I continued adhering the poppies I previously colored . To add dimension for some flowers I used the foam pads in two differtent thickness .

As last thing I added the sentiment "Hugs" and some matt black pearl.


That's it!!

Hope you like the card !

have a great week!

Ciao Ciao

mercoledì 22 febbraio 2023

Sending Hugs


Hi crafty friends!

another inspiration card today featuring the Alex Syberia Designs' products.


As you can see, this time I chose the craft/white and gold color combo ! Hope you like it as much as I do!

I  begun by die cutting  my background panel using  the Floral Lattice die; I die cut it two times and  I glued them together to add dimension and then I glued it on my white base cardstock.

I stamped the flowers from the Spring Garden stamp set onto  vellum and heat embossed them in white. I then die cut it with the coordinating Spring Garden die. To add more opacity I die cut one more time the flower shape. I went ahed gluing them on the card using some little dots of adhesive.


The sentiment "hugs" is from the "Love and Hugs" die set. the bottom layer was cut one time from white foam and  the top one from a gold heat embossed cardstock ( I used the WOW embossing powder "metallic polished gold") and the strip sentiment is from  "Expressing Gratitude " stamp set.

I complete my card adding some little gold rhinestones on the flowers.


I really like how my card turned out and hope you like it too.

Thanks for reading me,

See you the next week!

Ciao Ciao

lunedì 13 febbraio 2023

Classic Foliage to say thanks


Hi crafty friends!

Today I share with you a new card featuring the new products from the "Thank You For Being My Friend"!

What a best way to start the week! isn't it?

The "Classic Foliage" die set and the "Expressing Gratitude" stamp and die set are some of my favorite products  and I enjoy the making process!

I die cut many some foliage in different cardstock colors and I glued them on my white base card; once finished I stamped the "Expressing Gratitude" stamp  set  and I embossed it with the pink WOW embossing powder. I cut out a rectangle to glued over the foliage.


I added the Thanks sentiment  die-cut using the Large Thanks Die Set. I cut the top layer from white foam and the base ones  from heavyweight gold cardstock.

I stamped the "Expressing Gratitude" stamp  set  in black too , and I die cut all the sentiment using the Expression gratitude die set  adding on of them on my card.

Some gold rhinestone  complete the card.


And that's that! so simple !

I remember you  we are celebrating the new release with a Blog hop and a Instagram hop ! so if want the chance to win the whole collection or some gifts card don't forget to take a look at the blog post and at the IG account @alexsyberiadesigns and @nicolettaporcu.design

Have a great week

Ciao Ciao


So lucky to have a friend like you

Hi friends 
Today we have IG hop  to celebrate the Alex Syberia Designs'  second release so invite you to take a look at my profile @NicolettaPorcu.design to read all the details.

To make this card I used the "Classic Foliage" die set, the "Large Thanks " die and the "Expressing Gratitude" stamp and die set.
First I used them for embossing my blue navy background and then I die cut some white leaves and I glued them all over the blue  cardstock base.


I made the sentiment using the "Large Thanks" die and the "Expressing Gratitude" stamp set  and die. 
Once I glued them I added some  gold rhinestones.


And that's that!
 
For have the chance to win the whole release a gifts cards join in our IG hop at @alexsyberiadesigns  and our blog hop here.

giovedì 9 febbraio 2023

Alex Syberia Designs "Thank You For Being My Friend" February Release Blog Hop and Giveaway

Hello crafty friends
Today, we are celebrating the launch of Alex Syberia Designs'  second collection of physical products with  a fun blog hop!!
The new release  includes  clear stamps, dies and stencils and  also , one hot foil plate sentiment!!
I'm sure  there's something for everyone to love!


Joining with us  will see many inspiration projects made by the AS design team so you could appreciate the amazing collection.

Let me share with you the card I made for the event, using some of the brand new products: the Spring Garden stamp set and die   and the Floral Lattice cover die.


I started die cutting the light pink background using the Floral Lattice cover die ; next I stamped the flowers on X-Press paper and colored the flowers using Copic markers and die cut them with the Spring Flowers die set . Using the foam pads I put all the die cut over the pink background.


The sentiments is also  from the Spring Garden stamp... I stamped it on vellum and embossed in white ; using the same die I doubled it with the  pink cardstock and glued the sentiments over the flowers and as a last touch I added some pink pearls and clear rhinestones.

If you'd like to see the making process take a look at my Instagram account ..@nicolettaporcu.design  because a reel is on the way !!!


Alex Syberia Designs is giving away the full release bundle, valued at £280 ($340) in total, and giving away a £15 gift card to 2 lucky winners! 
All you have to do is leave a comment on this blog post as well as those of the other amazing designers in this hop. You can see the full list, with links to each blog, below.

Winners will be announced on the Alex Syberia Designs release blog  hop post on the February 20th.

Blog Hop Order:


Have fun joining us with this blog hop
I'm sure you will love the entire collection and the DT inspirations as much as I do!

Ciao ciao
xx

lunedì 30 gennaio 2023

Some kind of weave

Hi everyone!

today I share with you my latest cards featuring Alex Syberia Designs products.

It's  time for the Modern Weave Layering stencil, one of my favorite products from the release.

This because it's very simple and fast  to create beautiful and striking backgrounds for our creations.

The Modern Weave Layering stenci set consists of 3 different stencil and  I used one different Distress Oxide ink color for each of them; specifically used  Tattered Rose, Worn Lipstick and Festive Berries Distress inks

Once I finished with the stencils I die cut a rectangle and using foam tape I glued it over a white cardstock base. I glued over a small vellum rectangle and then  I added the "Smile" die cut , the sentiment string and the little gold  hearts from the "Sparkle and Dance" stamp set and dies set..


Here another version:

For this one instead  I used   the thanks die and the little sentiment from the "Create Your Own Happy" stamp set.


As I said before so very simple to make  right?

That's that!

Hope you like my cards!

Thanks for stopping by!

Ciao ciao


linktwin

Related Posts with Thumbnails

ShareThis