mercoledì 26 luglio 2023

Merry Christmas from across the miles

Hi crafty friends!

Today I share with you a new inspiration card featuring the new release "Christmas in July".

This is the time for the "Large Merry Christmas"  die , for the "Jingle Bell Joy" die set, for the "Christmas Sentiments" stamp and die set, and for the " Winter Foliage" die set.

I started die cutting a rectangle from a a purple cardstock using the dotted rectangle die from the  "Nested Scalloped Frames die set". Over it I embossed the small Christmas tree form the "Christmas Sentiments"  stamp  using the Versamark ink and a gold embossing powder.

I adhered the top panel on a black card base and I continued die cutting the  foliage I needed to compose my card using  the "Jingle Bell Joy" die and the " Winter Foliage" die set and gluing all of them on the  card.

Next up I die cut the "Large Merry Christmas"  die. a The bottom part of darker shade of a purple cardstock in 3 layers and the top from a metallic gold cardstock. I assembled everything and I put the big sentiment over the foliage,
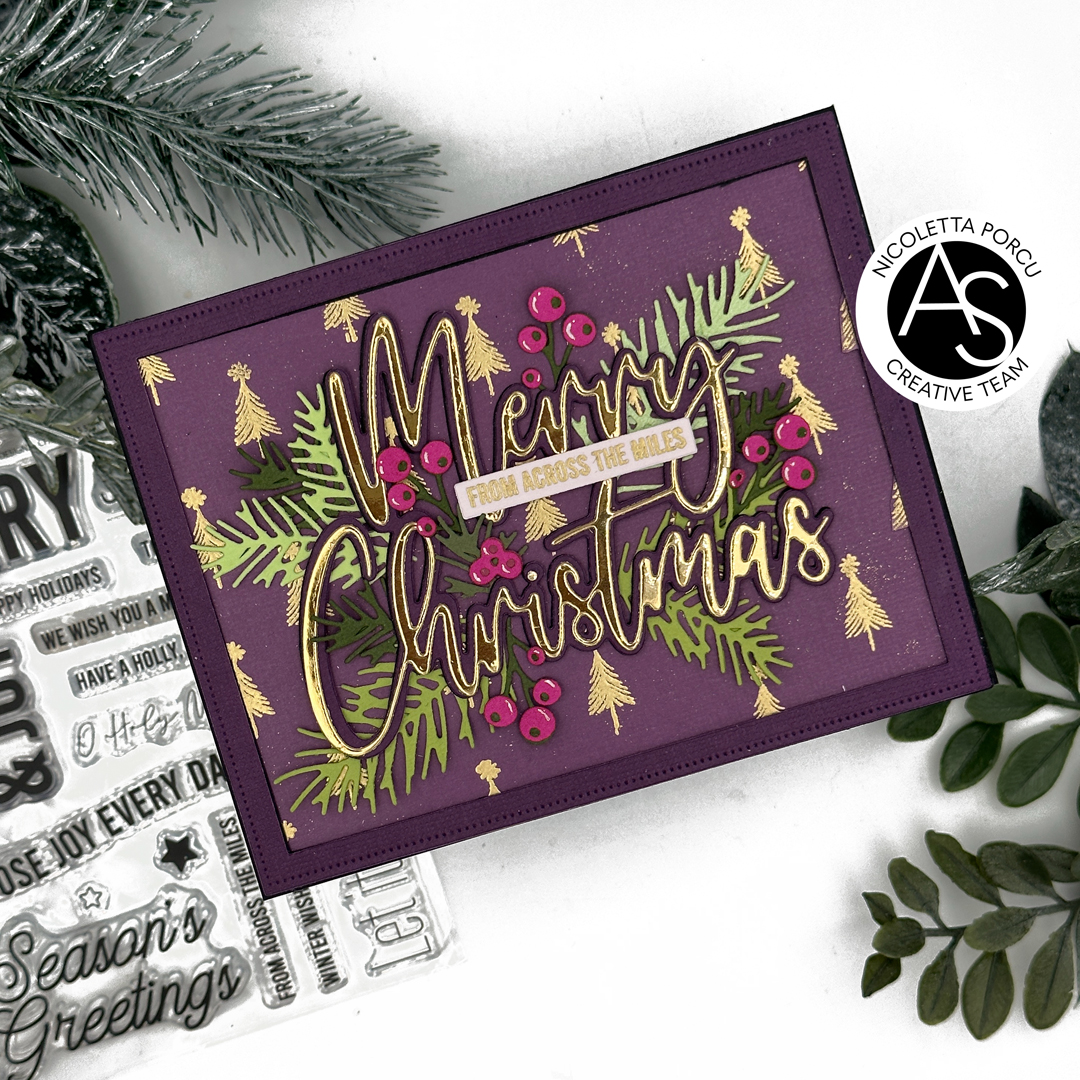
Next up , even using the "Nested Scalloped Frames die set" I die cut a rectangle frame   from the darker purple cardstock in 4 layers and  after I glued them all together I framed the card,

As a last thing I stamped and embossed in gold a string sentiment from the "Christmas Sentiments"  stamp set, I die cut it with the coordinate dies and I adhered it over the large Christmas sentiment.


And that's that!!

Hope you like my card!

thank you for stopping by and see you soon.

Ciao ciao
                                                               

giovedì 20 luglio 2023

Falala friends

i crafty friends!

I'm  here, today,  with a  new inspiration card I made with products of the new " Christmas In July" release!

Despite the very hot summer we are having in Sardina it's a pleasure play with Christmas critters , poinsettias and  falling snow! Actually never too early to think about Christmas right?

Anyway I had so much fun  in the making process and this is the result:


I used the Falala Friends stamp set and coordinate dies, the Falling Snow stencil, the Falala die and the Nested Scalloped Frames die set.

I started to create the snowing background on a craft paper using the Falling Snow stencil and a Texture Paste by Ranger, I let it dry and in the meantime I stamped the images of the Falala Friends stamp set I needed.

Once i colored everything with Copic markers I die cut them using the coordinate dies,

Next up I die cut a rectangle from the craft snowing cardstock using the Nested Scalloped Frames die set and I started to assemble the card by gluing this rectangle on a white card base. On the bottom I added a small white rectangle  with a pink border  in which I stamped the sentiment "fall"and then I added the critters and all the elements I previously die cut.


As a last thing I die cut the big sentiment Falala: the base in white cardstock and the top one in pink; I die cut this on  and in 4 layers I glued all together to add dimension.

Copic colors I used:

Pig: R85/R83/R81/RV52//RV10/RV00/R20//BG18/BG15/BG11/BG10/R29/R27/R24/R22/C9/C8/C6/C3/C1/C00/C0/0

Bunny:C3/C1/C0/C00/0/R29/R27/R24/R22/R20/R21/BG13/BG11/BG10

Falala:R85/R83/R81/RV10


And that's it!

Hope you like my card!

Thanks for stopping by

martedì 18 luglio 2023

Festive Poinsettia at Alex Syberia Designs ig hop

Hi crafty friends!
The brand new "Christmas in July" release from Alex Syberia Designs in live and it is he perfect incentive to get started early on those holiday cards! With new hot foil plates, stamps, layering stencils, and dies there's sure to be something for everyone!
And after the blog hop , yesterday we had a fun IG hop so you could have another chance to win fabulous prizes.
Check my instagram profile @nicolettaporcu.design to have all the info and follow the lineup  to see all the gorgeous inspirations by the design team.
But now let me share with you the card I made for the occasion!

I started by stamping the Festive Poinsettia on a X-Press Blending paper  and I colored the flowers and leaves with Copic markers. Then I die cut it with the  coordinate dies.

Next up I worked on the background blending  the following Distress Oxide:
Worn Lipstick, Kitsch Flamingo, Tattered Rose, Festive Berries, Mermaid Lagoon, Peacock Feathers, Evergreen Bough, Savaged Patina.
Once I get the color result I like I sprayed the paper with water and as it drayed I added white droplets using a brush.
As them drayed I die cut the rectangle base from the blended paper using the Nested Scalloped Frames die set


I continued  by gluing the background on a white card base and adding over   the colored poinsettia using foam pads and cutting out the protruding parts with scissors.


As a last thing I added the sentiment and some pink pearl.
I stamped and die cut it in many layers I glued together to add dimension.

Here the Copic colors I used:
Poinsettia: RV99/R89/R46/R17/R14/R12/Y28/Y26/Y23/
Leaves: BG57/BG49(BG45/BG34/BG32/BG11


Hope you like my card!
And remember to have time until midnight BST July 23rd 2023 to  join us! 

Ciao Ciao 

Nicoletta

giovedì 13 luglio 2023

Alex Syberia Designs "Christmas In July" Release Blog Hop and Giveaway


Hello crafty friends!!!
Today, we are celebrating the launch of Alex Syberia Designs' new release with  a fun blog hop!!
The new release "Christmas in July"  includes  clear stamps, dies, stencils and  hot foil plates.
I'm sure  there's something for everyone to love!

Joining with us  will see many inspiration projects made by the AS design team in the ASD blog post so you could appreciate the amazing collection. 

Let me share with you the card I made for the event, using some of the brand new products: the Angels Bells stencil set , the Angels Bells hot foil plate and coordinate dies,the Christmas sentiments and coordinate dies .


I started working on my backdrop panel die cutting a rectangle with the Nested Scalloped Frames dies set and then I die cut a decoration using a die from the Signature Tags Die set and on his back I glued a piece  of metallic gold cardstock . Next up I glued the panel  on a white cardstock base. 
I continued hot foiling the flowers  using the Angels Bells hot foil plate and then i colored them using the coordinate Angels Bells stencil set and Distress inks
With the  Angels Bells coordinate dies I die cut the lovely flowers and I put them on my background using foam pads to add a 3D effect. 
As a last thing I add the sentiment from the  Christmas sentiments stamp set. I stamped and embossed in gold and die cut it using the Christmas Sentiments die set. 


But let me share the details about the blog hop: 

Alex Syberia Designs is giving away two £15 gift cards to the Alex Syberia Designs store and one full release bundle, valued at £366 ($400) in total.

Alex Syberia Designs will pick the three winners from the comments left on each designer’s blog post in this hop before midnight BST on July 23rd 2023. The winners will be announced on the ASD Release Blog Hop post on July 24th 2023.


Have fun joining us with this blog hop
I'm sure you will love the entire collection and the DT inspirations as much as I do!

Ciao ciao
xx

giovedì 6 luglio 2023

Sending Love -Tulips Treasure

Hi crafty friends!

I'm  back today with a new inspiration cards featuring some other products from the Sunkissed Memories release!

This is the time for the Tulips Treasure stamp set and coordinate dies and for the Tiny Dots hotfoil plate.


To make my card I started by stamping the flowers from the   Tulips Treasure stamp set , coloring them with Copic markers and cutting them out using the  coordinate dies .

For the background I foiled in gold my  white top panel with the Tiny Dots hotfoil plate. I continued die cutting a scalloped frame using the Nested Scalloped Frames die set  and a 4 1/4 x 5 1/2 fuchsia rectangle.

On the white frame I traced a gold rectangle


As I had all the element ready I started to assemble my card gluing the fuchsia rectangle over a white card base. Next up I glued the foiled panel  and over I put the white frame using foam tape to add dimension.

I arranged  the tulips and over I put the sentiment I previously stamped, embossed in gold and die cut.

As a last touch I added some semi pearls.


That's that for today too!

Thank you for stopping by!

Ciao ciao!